

MGA! Tech Talk – MGA Rear Hub Leak Repair
 Tech Talk
with Bob Shafto, Technical Editor
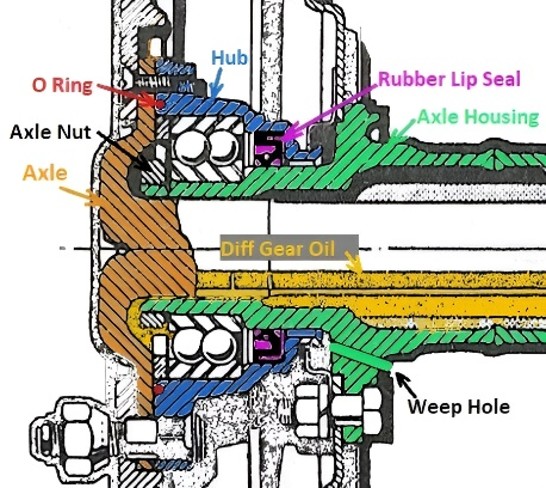 The rear axle housing is hollow end to end so the differential oil also oils the rear hub bearings and when the seals fail, oil can leak out the back or into the brake drum. The rear hubs are sealed in two areas; the inner side of the hub behind the bearing is sealed with a rubber lip seal and the outer side of the hub outside of the bearing with an O-ring and paper gasket.
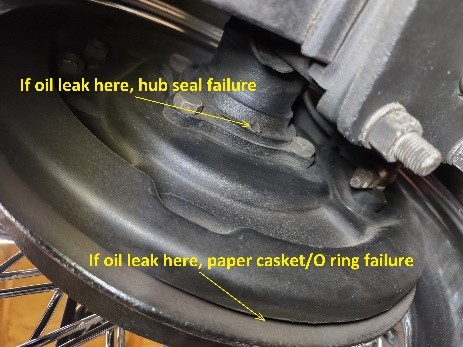
If the rubber lip seal leaks, oil will drip from behind the hub, either dripping from the hub itself or from a weep hole drilled through the axle housing where the backing plate mounts. If the O-ring and paper gasket fail, oil will leak into the brake drum and out around the edge of the drum, likely coating the shoes and the drum.
 The first thing is to unscrew the breather screwed into the top of the housing, on the right side of the differential, and make sure it can breathe with no obstruction. This vents the housing to atmosphere preventing pressure build up inside the housing that could push oil past seals.
To replace the rubber lip seal, you will have to remove the drum, all the brake components and the hub. The hub nut is octagonal 1-61/64 inch and is left hand thread on the left side of the car and right hand on the right side.
Inspect the axle housing seal and bearing surfaces (journals) for rust, pitting, scoring and groves.
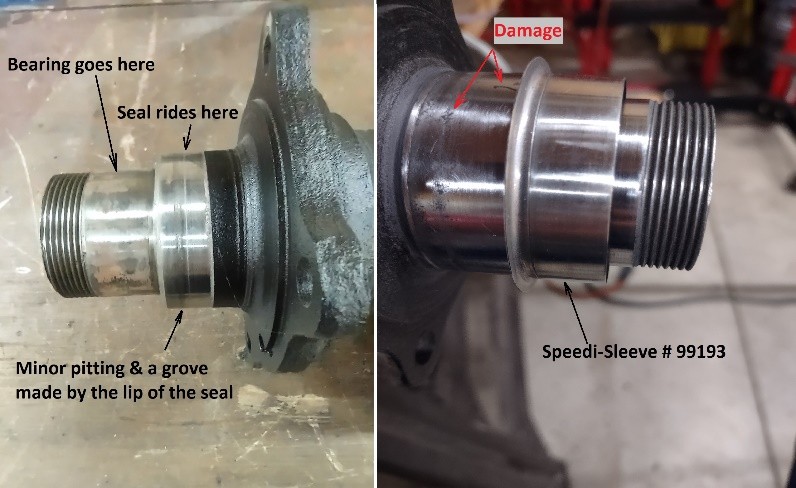 Clean and polish the journals with ¾ inch wide sandpaper strip beginning with 400 grit and work up to 800 grit. Wrap the sandpaper strips around the area in a U shape, pulling in a seesaw motion, like buffing a shoe with a rag, making sure to work around full 360 degrees.
Once the journal is clean and polished (with no imperfections) measure the diameter, it should be between 1.937 to 1.940 inches. If less than 1.937 inches you need to install a Speedi-Sleeve # 99193. This is an easy process, but the installation tool that comes with the sleeve is too short to work. I find that a 2-inch ID to 1 7/8-inch OD exhaust coupler fits the Speedi-Sleeve perfectly and the installation tool fits the other end. To install the sleeve, you need to do two things. The first is to notch the installation lip on the sleeve to make the lip easier to remove. The other is to smear a thin coating of non-hardening gasket sealer (Permatex No, 2) on the surface to help the seal slide on and to seal against moisture penetration causing further damage to the journal. Keep the sleeve aligned with the journal as you tap it into place using your home-made installation tool. Be careful to not drive the sleeve too far onto the journal, just far enough to expose the stepdown to the bearing journal.
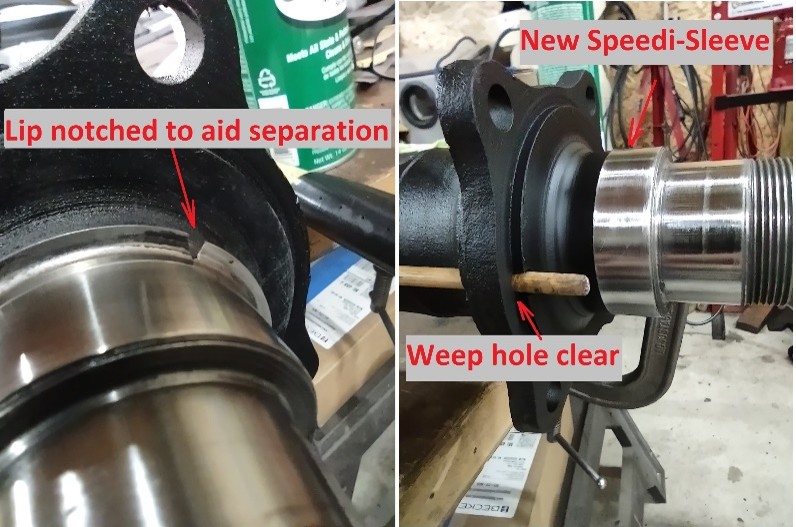 Removing the installation lip on the sleeve is a little tricky. Start by separating the lip from the sleeve at the notch you cut in the lip before installation. Be careful not to cause a tear in the flat part of the seal. The lip can be peeled off like the old coffee cans or sardine cans, but this could tear into the flat seal surface of the sleeve. It is best to grab the vertical lip with a pair of pliers and twist away from the sleeve horizontally, like tearing a check from a checkbook. This does not cause a curl on the edge of the sleeve. Work around the sleeve, continuously separating the lip from the sleeve about ½ inch at a time until you have complete separation. Clean off any Permatex.
Clean off any remaining remnants of the paper seal on the hub; I like using the ½ inch wide Exacto chisel blade for this. Make sure there are no bumps or blemishes on each of the mating surfaces, sand flat if necessary. Wipe the outer edge of the seal with oil and install the seal into the hub then install the bearing.
Now it is time for the O ring seal and paper gasket, but it is important to note that the O ring is the primary seal, the paper just absorbs the minor imperfections in the mating surfaces, sets the proper groove depth and keeps the two mating surfaces from sticking together. It should be oiled but do not use sealant.
There are two different size O rings depending on the model. 1500 is slightly larger than 1600 and Mark II because the 1500 has a thin wall between the O-ring and the bearing while the 1600 doesn’t. On the 1600, the outer bearing hub becomes the inner wall of the groove. The thickness of the O-ring matters as well as the diameter and the thickness of the gasket.
From The GURU; “The gland in both hubs is 0.088 deep and 0.131 to 0.133 wide.
Both use a 0.117 diameter cross section O-ring, but slightly different overall diameter.
1500 gland OD=3.545 ID=3.283 width=0.131 depth=0.088.
1600 gland OD=3.413 ID=3.147 width=0.133 depth=0.088.”
The 1600 O-ring will fit the 1500 hub, but the 1500 0-ring is too big for the 1600 hub. This is where the thickness of the paper gasket comes in. To get a proper O-ring seal, the O-ring must fill 80% to 90% of the gland (cross section area of the O-ring / cross section area of the gland multiplied by 100) and the thickness of the gasket makes the depth of the gland deeper. The original paper gasket was 0.009 inches thick making the gland now 0.091 inches deep. Many aftermarket paper gaskets are 0.013 thick or more, so with a modern gasket the fill percentage goes down and makes soaking the gasket in oil even more important to make sure it flattens when assembled. A dry, thicker gasket or adding gasket sealer only weakens the O-ring seal.
Before sliding the hub back on to the axle housing, oil the seal lip and the seal journal, then slide the hub on, next the washer and tightened to 150-180 ft lbs. Use a flat blade screwdriver to lift the edge of the washer adjacent to one flat of the axle nut. Don’t hammer it home. Hammering can weaken or crack the bend, instead use channel lock pliers to bend the edge of the washer flat against one flat of the axle nut.
The last thing is to top off the differential gear oil. Fill to the bottom edge of the fill plug on the back side of the differential.