
MGA! Tech Talk – July/August 2017

 While restoring an MGA, we always strive to know how the parts originally appeared. We may not choose to refinish that way, but it’s always nice to have that information to make an informed decision. In this issue, we will look at several components and offer some restoration tips.
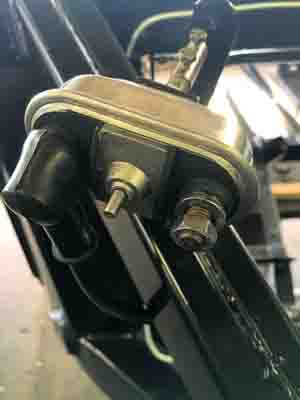
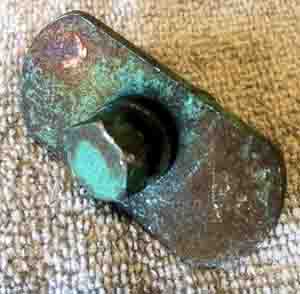
The cast iron combination master cylinder was apparently never painted. Same for the brake master on Twin Cam and Deluxe cars. Even today’s replacement cylinders are left unprotected. Thus, in short order, they become rusty and unsightly. But with a little work, the old rusty cast-iron eyesore can be made to look like new again. Or, if installing a new unit, you can protect the casting so it will remain looking great.
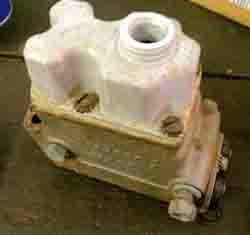 My method is to remove any rust and contaminants from the cast iron body and then apply a light coat of self-etching primer. I then use a great product from Dupli-Color, called Cast Coat Iron Engine Enamel. Apply two light coats and allow to dry. The upper reservoir cover, which is made of aluminum, can be cleaned and brightened to a suitable level using a polishing compound. You should take note that if your car has disc brakes, it should have the 1600 style top cover, which is extended to increase fluid capacity to compensate for brake pad wear.
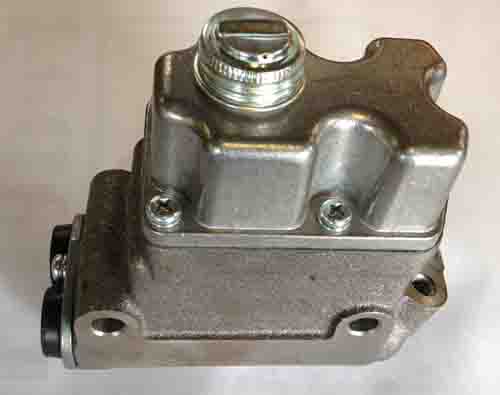
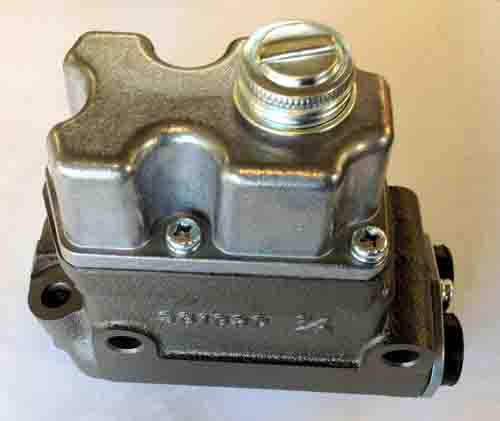
A reproduction master cylinder before painting. Note rust on cast iron.The same reproduction master cylinder after painting. No rust!
The mounting hardware should be re-plated or replaced to give the cylinder an as-new look. On some replacement cylinders, the cover screws are incorrect in appearance. They should be a flat slot cheese-head screw, which is available from various suppliers. Lastly, your project will deserve the proper filler cap. The originals are almost always rusted beyond repair, and most replacements are a plastic version. One of our longtime advertisers, Scarborough Faire, offers a very nice metal reproduction cap. If you’re using silicone brake fluid, no worries about your new paint. However, if you are using conventional DOT 3 or DOT 4 fluid, be very careful not to let any come in contact with your paint!
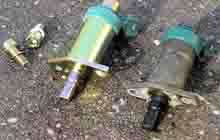
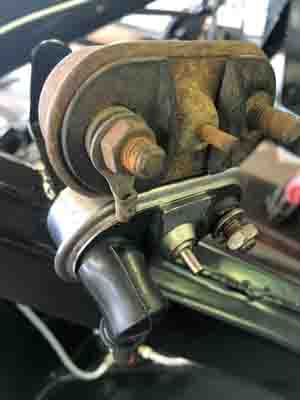 Another restoration tip was prompted by a comment I saw on the MG Experience site. There was discussion of how different the reproduction MGA starter switch looks from the original. Actually, I like the design of the modern replacement. It incorporates a plastic insert, to which the main terminals are placed, whereas, the original featured a metal plate with rubber insulators to prevent grounding of the battery leads. The modern unit is a bit less susceptible to shorting out. While this part is visible on the TD and TF cars, it is relatively hidden when on the MGA, either by the large fresh-air hose on pushrod cars, or the carburetors on a Twin Cam.
 However, I do offer a solution to those who really want everything to look authentic. Simply mask off the body of your new starter switch, and paint the white plastic center section silver. Allow it to dry, and then add tape to the center section between the posts and the outer edge of the plastic area. The remaining exposed surface will represent where the rubber insulator blocks were. Paint that remaining area with flat black paint to replicate the rubber insulator. This will result in an almost indistinguishable part from the original when installed on your car!
Another area of authenticity for the purists is the fender bolts and retaining washers. Replacements are available in sets from most of our suppliers, and they are nicely zinc plated. And many of us will be very pleased with how they look when installed. But, to do it like the factory did, you’ve got some work to do. The MGA body was painted with fenders hanging loosely on the car, with the fender bolts loosely installed. Once the car was painted, the welting was dropped into place and the fender bolts were drawn up. So, the fender bolts and washers were inadvertently painted to some degree dependent on the line of sight from the paint gun. In most cases, only one side of the bolt head got any paint, and when the bolt was tightened, that painted side could have faced in any direction. This is one area that true authenticity actually makes the finished product look a bit, well, non-factory! So…which way will you go on your restoration?
 Bolts and fasteners in an automobile are critical when making your car safe to drive. The improper grade of bolt on a suspension or steering component could result in adverse effects. When restoring a car, it is important to keep this in mind when refinishing or replacing hardware. A severely corroded original fastener should always be replaced. However, if in decent shape, with just minimal surface rust, they can be re-plated in zinc or cadmium, which will result in a safe and highly original car. Finely restored cars will lose a lot of credibility if non-authentic bolts abound.
But take in a handful of old bolts to your plater and you’re going to find a bill for $100 or more! Most platers have a minimum fee, and they recommend that you bring all of your fasteners in one large bucket and they’ll plate everything for that same $100. For most of us, that’s not a real possibility as we do portions of the car one at a time. Or, if in a full restoration, we’ve carefully bagged and tagged all the components to keep them organized. The last thing we would want to do is dump all those fasteners into one bucket. I have done it, and I can assure you, it takes a l-o-n-g time to sort through them all. Plus, there is always the risk of something getting lost.
A great alternative is to plate the parts yourself! Ed Kovalchick offers an inexpensive approach to small batch plating:
Zinc This: Preserving Metal’s Perfection At Home
For those who want to preserve the finer bits and pieces of raw steel and iron on their vintage vehicle’s appearance (sans ugly rust) for years to come, the processing of galvanizing metal can easily be done in your own home shop. Essentially this method applies a zinc coating using a few simple chemicals, and some low-amp battery electricity. And, as most of you know, rust eventually creates metal weakness, including sometimes-dangerous breakage.
At a local vintage car show, I had a chance meeting with one interesting Alabamian, George Brengelman, a retired aircraft quality control inspector, who was proudly displaying his handsome MGA, newly restored by himself. Per chance we discussed several issues regarding metal restoration and preservation of older vehicles when he began showing me parts he had drowned in zinc in his home garage – they looked great! So, I asked him some questions.
How did you learn about applying zinc coatings in the beginning?
“I read a lot of car forums and every once in a while the topic of zinc plating comes up. Being a self-taught car restorer, I have never thought that plating metal parts on a car was something that could be done at home, so I started doing a lot of research online.” (Note: this YouTube video shows a simple process example).
Where did you get the do-it-yourself recipe?
“You can find many sources online for zinc plating and I do not remember the specific site, but all are very similar and you can even get DIY kits from several suppliers. I used a zinc strip – 3″ X 50′ used to keep moss from growing on roofs purchased through Amazon.” (Note: www.eastwood.com is a prime example).
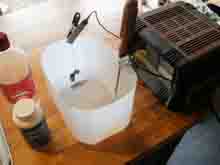
“To start out, several days in advance, you need a container suitable for the parts that you intend to plate, an amount of white vinegar, Epsom salt, Karo syrup or sugar, a source of DC power, and some sacrificial zinc.” (Note: Marine parts departments have supplies of zinc anode).
How much time does this process take?
“Each part will require a different amount of time to prepare, the part has to be perfectly clean (no rust, paint, oils or grease) and the amount of time in the solution varies as to the number of square inches of surface to be plated. A dozen nuts, cleaned, may take 15 minutes in solution to plate, then another 15 minutes to polish then repeat.”
What parts do you use the zinc coating on in particular?
“I plate any part that originally had no other coating when the car was built.”
What are the advantages of applying the coating to vintage cars?
“Originality. Durability.” (Note: preservation of the original look or better)
What is your experience with the process over time?
“Holds up well; my first test piece was a piece of 1/8″ steel plate 1″ X 3″. I have it tied to a wire and have it lying in a flower bed next to my driveway. After two plus years, the finish has become dull but shows no sign of rust.”
Will you use this process in the future?
“I use this procedure every time I work on a vintage car.”

Well, I personally plated my first bolts from a 54-year-old MGA and it went well using ½ gallon of 5% acid vinegar, 1 cup of Epsom salts, an anode purchased locally, 1.5 volt battery, and ó cup of sugar. The bonus is that you can use the same concoction over and over! If not for the beauty, protecting hardware and more from aggressive rust is worth the effort in many cases. So, if asked, tell them George sent you- that’s what I did.
Thanks for the valuable information Ed! This is indeed an economical and effective way to refinish your fasteners. But if you’re not the MacGyver type, such as Ed and George, there are complete plating kits available for a minimal investment. I have had remarkable success with a kit from Caswell Plating.
The MGA and Magnette are well built automobiles, and with a bit of dedication, they can be properly restored to a very high level of detail. If you have any questions of authenticity, send me a note, and we’ll make a future article about
Safety Fast!