
Electronic Ignition for MGA and Magnette

 There are a few different electronic ignition conversions on the market for the MGA, and I had been thinking for some time about trying one on my MGA. Not that the standard ignition was causing any problems; I find it to be very reliable and trouble free. But the electronic ignition was out there, with some modest claims of improved performance! So, somewhat on a whim, and to provide a topic for this article, I decided to order one and try it out. The two primary conversions for the MGA offered in the suppliers’ catalogs are the Ignitor and the Crane. Both conversions retain the original coil, and provide an electronic replacement for the points and condenser in the distributor. The Ignitor conversion accomplishes this entirely within the distributor, whereas the Crane conversion has an external electronic module in addition to the components installed in the distributor. The Ignitor conversion is priced around $100, and requires that your car be wired with negative ground. The Crane conversion is about $130, and is available in both positive and negative ground versions. Both of these conversions for the MGA apply to the Magnette as well.
I opted for the Ignitor conversion because it fitted entirely within the distributor, which meant that I did not have to find a location for the external unit. For the purist, the Ignitor would be the preferable unit because, other than a minor difference in the appearance of the distributor wiring, there are no obvious signs that anything other than the original equipment is there!
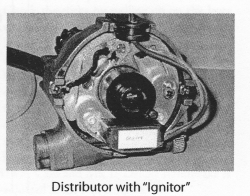
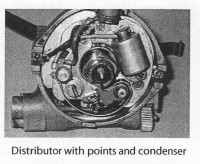 The Ignitor conversion has two components. An electronic module that attaches to the distributor base plate in place of the points and condenser, and a “trigger” module that fits down over the cam on the distributor shaft under the rotor. To check out the installation, I installed the two units on a spare distributor, as shown in the photographs below. (Observant readers will notice that the vacuum advance mechanism has been cut off. That is because I had used the distributor at some time in my TF, and not because the vacuum advance is not required for this conversion). The installation was very simple. The points and condenser are removed by removing the large screw securing the points assembly, and the smaller screw securing the condenser. The electronic module is attached to the plate by the small screw that was used for the condenser. There are a couple of holes in the module plate for this screw, and the one that lines up with the tapped hole in the distributor base plate is selected. The leads from the module pass out of the distributor through the hole where the original plastic terminal mounting was located, and a shaped rubber grommet is provided to fit this hole. A tie-wrap is provided to secure the wires to the distributor base plate to keep them out of the way of the rotating parts, and to prevent any strain being placed on the wires. The original black grounding wire for the distributor base plate should be retained and grounded to the closest base plate mounting screw at the side. With the module in place, the trigger module is slipped down over the distributor cam, and the installation in the distributor is completed with the replacement of the rotor and the distributor cap.
So, having tested out the conversion on the spare distributor, I then proceeded to convert the distributor on the car. Because of the inaccessibility of the distributor on the MGA, it would be better to remove the distributor from the car before attempting the conversion. However, because I had already had a practice run on the spare distributor, I was able to make the real installation by feel and by using a mirror. The most difficult part was seeing which hole to select to mount the electronic module to the base plate. The installation took less than ten minutes, and the engine started right up. I checked the timing, and it was right where it should be.
Wiring diagramThe final step of the real installation is the wiring. The original wire from the distributor to the coil is disconnected at both ends and is not required for the conversion. The red and black wires from the electronic module in the distributor are then connected to the two coil terminals. The black wire connects to the terminal from which the original wire to the distributor was removed. The red wire connects to the other terminal on the coil (see Figure 4).
I have not driven my MGA enough to determine if there is any performance difference with the Ignitor conversion installed. The main advantage is that there is no longer any point gap to check and reset, which also means that the timing should stay correctly set for a longer period. I do not know anything about the reliability of this or any other conversion, although I was a bit suspicious when the directions suggested saving the old points and condenser set as a back up in case of failure of the electronic unit!
Editor’s note the “Ignitor” system is made in the US by PerTronix Inc (tel (909) 599-5955) and is now available for both positive and negative ground systems. It comes with a 30-month warranty. (This is not an endorsement for this product). Visit the Pertronix website.
Comment by: Mike Ash
I found the static timing to work just fine after the initial installation, although the equivalent of “points just opening” did not seem to be quite as well defined as with the actual points system. Checking the static timing with a timing light after the car was running confirmed that the static timing was quite close, and could be corrected with a couple of tweaks of the A/R nut.
Comment by: Gilbert Clark DuPre, Jr
I found that static timing with the pertronix ignitor was easier than trying to stand on my head and hold a timing light on a timing groove on the pully to line up while adjusting the distributor.
Comment by: Gilbert Clark DuPre, Jr
I had a ignitor fail after abut two months in my B and Pertronix replace it after I sent the old unit back. Never had one fail again in both MGA and MGB
Comment by: Mike Ash
I have never heard of anything like that, it must be a defective unit. I would suggest contacting Pertronix, they have a technical line. I had a unit in my TD that would run for about 2 miles and quit, but re-start and run another 2 miles. I contacted Pertronix and they wanted me to have it checked my a “MG mechanic” before they would consider replacing it, so I just re-installed the points. Maybe you will have better luck dealing with them. However, I have many thousands on miles on my other Pertronix installations and still think they are an excellent upgrade to the ignition system.
Comment by: Ronald G. Steltz
I installed a pertronix last week on my 1960 MGA and on initial start a chunk was blown out of the igniter. have not decided yet what to do and if they would stand behind it. BTW i installed one on my1954 3100 chevy truck and used it for a number of years with no problems.
Comment by: Gordon Wright
Fitted Pertronix last year as couldn’t get condensers to last more than a couple of months. Car now starts at much lower cranking speed, is MUCH smoother (my wife commented immediately) and ‘pinking’ that I had been trying to cure for years has disappeared. Previously I had the distributor rebuilt and set up with timing light/dwell meter – even charted the advance v revs to see if it would give me any clues , but no joy. Only way of reducing the noise was by significantly retarding the timing and running on 98 octane with booster. So, not sure why I got this result but very pleased!! No other changes were made and static timing was simply set to figure in workshop manual.
Comment by: Mike Ash
Could be just a coincidence. However, the Pertronix unit is specific about the coil resistance – a minimum of 3 ohms, I believe. Pertronix does not specify the consequences of using an incorrect coil, but it could be damage to the coil.
Comment by: Robert D. Peate
Shortly after replacing my points and condenser with the Petronix – Positive ground system, it had remarkably improved starting. However, I did shortly afterwards start having coil problems. Once replacing the coil, all is well. Could have just been a coil on its way out. It’s been running fine for over a year now.
Comment by: David T. Smith
Mike:
Great article. On my MGA race car, I did notice a significant power improvement with the Ignitor system over the conventional point/condenser system. That was above 5500 rpm, so possibly not as important for the street.
However I also had a Crane electronic system failure in my 1967 AH Sprite, which uses the same distributor as the MGA. Nice to have a point/condensor assembly in the trunk to get me home.
Comment by: Mike Ash
Sorry for the delay in response, I have been traveling! The ignitor directly replaces the points system, so there is no change in specs. Set the timing with a strobe light to the factory specified 7 degrees before TDC at about 1000 – 1500 rpm with the vacuum line removed from the distributor and plugged.
Comment by: Dennis D Lines
Mike,
I have also recently converted to the’ Ignitor’ system and found it to be as straight forward as you describe. I also found easier starting after the conversion. One question I have is, what dynamic timing spec do you use after the conversion?
Thanks,
Dennis Lines