
Fuel Gauge Problems

VOL 26/NUMBER 1
 MGAs and Magnettes do occasionally break down on the road. However, the most embarrassing situation is when you run out of gas. MGA fuel gauges are notorious for giving inaccurate readings, or no readings at all. In this tech article, Mike Ash covers all aspects of testing the gauge and the tank sender unit, and what can be done to ensure your gauge reads correctly.
I do not recall with whom, but one of the parking lot discussions (at GT-25) centered around a participant’s fuel gauge and its inability to read less than half full, even when empty. Not being a technical expert in such matters, I could not recall the tests I had used on my fuel gauge problem some years ago, but knew that I had covered the topic quite extensively. The previous article was in MGA! Volume 15, Number 6, which would be about 10 years ago.
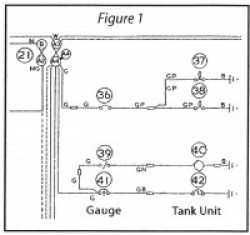 The basic circuit for the fuel gauge is quite simple, and is shown in Figure 1 from the MGA 1600 wiring diagram. There is a green (G) wire from the fuse block (21) terminal A4 to the gauge (41), a green/black (GB) wire from the gauge to the sending unit (42) in the tank, and the sending unit is grounded by being bolted to the tank. The case of the gauge is grounded as well, I believe by a black ground wire connected under its retaining nut. There is a connector in the green/black wire, which is physically located with a bunch of other connectors somewhere near the starter switch.
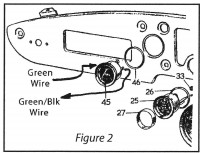 Be sure that the gauge is correctly connected. (Figure 2) Looking at the face of the gauge, the left terminal is connected to the ignition (green) circuit, and the right terminal is connected to the sending unit (green/ black). These connections are the same for both positive and negative ground systems. The terminals are identified on the back of the gauge, with a “B” for battery stamped on the case near the left terminal, and a “T” for tank stamped near the right terminal. However, these markings are very difficult to see when the gauge is installed in the car!
Problems with the fuel gauge are either an incorrect or no reading, or an erratic and unstable reading on the gauge. Both of these problems can be caused by faults in the gauge, the sending unit in the tank, the wiring, or any combination of all three.
As an initial system check, turn on the ignition and disconnect the wire from the tank unit, the gauge should read empty. If the gauge does not read empty, then the probable cause is a problem with the calibration of the gauge. Do not reconnect the wire, but ground the end to a good ground on or near the tank, the gauge should read full. If the gauge still reads empty, then the gauge may be bad, there may be no power to the gauge, or there is a problem with the wiring between the gauge and the tank unit. With the ignition still on, check that there are 12 volts on the left terminal of the gauge as you face the front of the gauge. If there are, ground the other terminal. If the gauge still does not read full, then the problem is with the gauge. If it does read full now, then there is a problem with the wiring between the gauge and the tank unit. If, when the wire to the tank unit was grounded, the gauge read something less than full, then there is a problem with the calibration of the gauge.
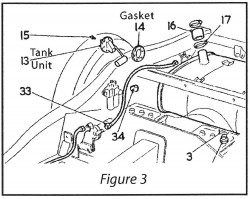 If the preceding checks reveal that there is no indicated problem with the gauge but the gauge still does not read correctly, then the problem is most likely with the tank unit itself. (Figure 3) The tank unit is a cylindrical float attached to an arm that moves across a rheostat, or variable resistor. When the fuel level is low, the float is low, and the arm is at the high resistance end of the rheostat. When the fuel level is high, the float is high, and the arm is at the low resistance end of the rheostat. I checked four used tank units that I have squirreled away in the attic, and the general consensus was that the resistance of the tank unit is about 90 ohms when the tank is empty, and less that 10 ohms when full.
The best way to check the tank unit is to remove it from the tank; preferably when the fuel level is below a quarter full! With the unit out of the tank, leave the green/black wire connected, and ground the case of the unit to the car body or chassis. Make sure this is a good ground, and be wary of generating any sparks that might ignite any gasoline fumes coming from the tank! With the tank unit connected in this way and the ignition on, move the tank unit arm over its full range and watch the gauge; you may need a helper for this. As you move the tank unit arm over its full range, the gauge should also move over its full range. For correct operation, the gauge should read empty or full at the exact point that the tank unit arm reaches the appropriate end of its travel. If the gauge does not appear to read correctly as the tank unit arm is moved over its full range, the problem could be with either the gauge or the tank unit. The tank unit is the most likely. Any erratic movement of the gauge as the tank unit arm is moved is probably caused by a bad or dirty connection in the circuit. If the external connections and car wiring all appear to be good, then there is probably a bad connection that is internal to the tank unit.
When I wrote on this subject last time, I used the problems with the gas gauge reading in my own car as the basis. In that case, replacing the tank unit corrected the erratic movement of the gauge, but the gauge did not read either completely empty or completely full when the tank unit arm was moved over its full range. Replacement with a new gauge corrected that problem as well.
There are two nuts on the back of the gauge that secure two coils inside the gauge. The electrical current passing through these coils attracts the needle in one direction or the other depending on the amount of current. The gauge is calibrated at the factory by the placement of these coils. It might be possible to recalibrate a gauge by loosening the nuts and moving the coils, but I have never had occasion to try it.
After I had written on this subject last time, a member wrote to say that one possible reason for erratic behavior of the gauge needle is poor contact at the rheostat within the sending unit. This could be because of poor grounding of the moving contacts. The moving contacts of the rheostat are attached to the float arm and find a ground through the point where the arm pivots in the housing. Corrosion or looseness at the pivot point can possibly cause an intermittent ground, which in turn, would cause erratic behavior of the gauge needle. The member solved this problem by running a ground lead between the float arm and the unit housing. The ground lead should be a thin, flexible wire soldered to the float arm at one end and to a solder lug under a screw tapped into the housing at the other. The lead should be long enough to allow the float arm to travel over its full range. The added lead will then make a very positive ground, instead of relying on contact at the pivot point.
Comment by: Robert G Jones
Jim
Thank you.
Tried the ground first but did not help. Pulled the sending unit,did a ground and watched the gauge as I moved the sending unit up and down. Gauge was all over the place. Replaced the sending unit with an OEM I had. All works fine
. Does any one know what the OEM nut size
is for the sending unit wire?
Jim
Thanks for your feed back. It was a help
Bob
Also NH
Comment by: Alan J Mail
Bob, It sounds like your “T” (tank) wire is not grounded…which causes the gauge to read Full all the time.
The ground was originally through the hard piped metal fittings, but sometimes they have been replaced with rubber pieces, effectively isolating the tank. Many people (me included) run a new ground wire from one of the fuel gauge tank level indicator machine screws (the six that hold it into the tank) to the frame nearby.
JIM in NH
Comment by: Robert G Jones
Mike,
Had my fuel guage rebuilt by Nisonger and replace the sending unit with one from Moss. Filled the tank in my garage and guage read full. Ran out of gas at the 1/2 guage reading. When I knew I was low on fuel I drained the tank. Guage read full. Is it possible I have a couple of wires backwards??
Thanks,
Bob Jones
57 coupe
Comment by: Alan J Mail
Just a follow up – I got my gauge working – kind of…
Tank sender seems to be working. I pulled it out and checked it and the small wire was broken – I repaired it and tested it and it worked. I installed it in the tank and connected it.
The dash gauge I pulled and calibrated at 1/2 and F with the pair of 68 ohm reisistors per Barney Gaylord’s instructions.
Now, it sometimes works in the car and sometimes not. If the tank is full, and I tap on the gauge face, it will jump from E to F and then work until the tank gets down to 3/4 then it drops to E again and only a lot of tapping will make it read anything, and then only down to about 1/4 or a bit more.
I am going to take the gauge out and do the whole calibration again – it’s really touchy since you have to move the posts, tighten, measure, then move, then tighten, then measure – a lot of patience is required.
JIM in NH
Comment by: Mike Ash
I may have a mild case of dislexia, or something, because I keep getting confused over this point, and occasionally transfer my confusion to print! With the T-terminal grounded, the gauge should read empty, and with it open (disconnected) it should read full. So, you are getting a correct reading. It sounds like, for some reason, the sending unit has developed a short while the car was parked. If you get a full reading with the wire disconnected at the sending unit, the problem must not be in the wiring harness or the gauge. If the wire is not shorting out at its connection to the sending unit, then the problem must be in the unit itself. I think you will have to remove the unit from the tank before checking any further. Which, of course, means draining the tank down!
Comment by: W. Kirk Crawford
Mike,
I have a 1959 MGA 1500 with a fuel gauge problem. The car was parked in June with a full tank of gas and the gauge was working fine. I got the car out yesterday for a drive and the fuel gauge was reading empty so I added more gas. The tank is very full and the gauge moves to E when the key is on. I disconnected the sending unit wire at the tank and got a full reading when the key is own? Your test procedure states that I should get a empty reading with the wire disconnected. What should I check next? Thanks for your help.
Kirk
Comment by: Frazer L. Rice
A talk with Apple Hydraulics indicates they have not changed their rebuilding materials for carburetors due to ethanol. Weak points will be the braided fuel lines in the engine compartment and any other rubber or flexible line in the fuel system. Most people use Staybil if the car is going to sit up for some time. There is also Sea Foam. Check around on the internet for comparisons.
Frazer
Comment by: Steven Accarino
Is there any one type of fuel that is best for a 1961 MGA if I cannot find no-ethanol gas? And is there one best additive to add to the gas?
Steve
Comment by: Frazer L. Rice
Mike, close examination of the gas gauge showed the needle looking slightly bent. We carefully straightened it out so now with no power it rests on the pin and with power it jumps up slightly to empty. When we get to the actual gas in the tank stage, hopefully in the next month or so, I’ll measure out 1/4 tank worth and see what happens.
Frazer
Comment by: Mike Ash
No, you are not missing anything. Unfortunately, I got it backwards in that article, and corrected the mistake in a subsequent article. With the T-terminal grounded, the gauge should read empty, and with it open (disconnected) it should read full. On my sending unit for the subsequent article, I measured the “full” resistance at 81.1 ohms, and the “empty” resistance at 1.3 ohms. That sending unit worked well with my gauge – from full to empty. My apologies for the error in this article.
Mike.
Comment by: Ken & Mary Ellen Doris
Mike – you say that the resistance is high when empty and low when full.
With 12 v to the “B” terminal and a ground on the case, when I ground the “T” terminal (i.e 0 ohms) to the case I get an empty reading. I then attached it to ground through a 68 ohm resister and got a full reading.
Am I missing something?
– Ken
Comment by: Frazer L. Rice
Thanks for the reply. Nisonger did the gauge, also a long time ago, so I would have to send both back if the test shows it needs calibration. We may have several old sending units to try also. However, the speedometer needs to go back after we do the rolling ratio test since I have installed a B overdrive (don’t tell anybody). It will have to be re-geared to read correctly. So, they could all go together. How about this as a thought, a hidden variable resistor in line to the gauge that could adjust the input voltage exactly? That way if the sending unit, probably a poorly made import from you know where, fails a new or even a good used one could be installed and adjusted. This assumes the sending unit has the full range of output voltage the gauge requires. This could increase the resistance at the high end (empty). Maybe I’m over thinking this. I will be back working on the car Monday and will do the tests you recommend.
Comment by: Mike Ash
I would suggest you do not attempt to adjust the gauge, particularly since it has just been rebuilt. I know it is a pain in the rear, but I would suggest first pulling the sending unit from the tank, and testing it with the gauge over its full range. If the readings are still incorrect, and if the repair shop is convenient, I would suggest contacting the repair shop to see if they would check out both items together, and maybe calibrate the gauge to match the sending unit.
If you have had the sending unit for 10 years, it is possible that replacement items being supplied then were not correct. I recently purchased a new sending unit from Scarborough Faire, and it worked perfectly with my gauge – that is at full and empty.
Comment by: Frazer L. Rice
With restoration of my MKII moving along we are now at the point of using a battery charger to supply 12V to check various circuits as we go. I noticed that my restored gas guage reads 1/8 of a tank when the key is on. The sending unit is a new reproduction with a chassis ground hooked up to one attachment screw. No gas has ever been in the new tank. So, if I reluctantly pull the sending unit and moving the float up and down does not get me from empty to full, then what? Another new sending unit might be no better unless they have improved in the 10 years or so since I bought this one. Since the article mentions adjustment of the guage internally, should I send the guage and the sending unit back to the shop that did the guage? Or shoud I fearlessly try an adjustment myself? Has anybody successfully adjusted the guage itself?
Comment by: Alan J Mail
Thank you – very clear. Off to tackle my gauge now, which is stuck hard on “E”.
JIM in NH
’57 MGA