
Recommended Safety & Mechanical Checks for Your MGA – Part 1

 In a recent article in MGA! magazine, I suggested that the useful and safe life of a tire might be ten years, regardless of tread wear. This was an uneducated suggestion based some of the material I had been reading, and in the absence of anything definitive from the NHTSB, a Government agency that advises on such things.
Shortly after completing and submitting the article, I received my April issue of Practical Classics, a British magazine devoted to the restoration and enjoyment of classic cars. In that issue, there was an article entitled “How to MOT your classic car yourself”. As you may know, the British “MOT” is the equivalent of our state inspection. In that article, under “Tyre Vigilance,” were the obvious checks for “cuts, cracking, and bulges,” followed by: “If it’s (the tire) over five years old, consider replacement.” A much more conservative age limit than my previously suggested ten years!
Looking through the rest of the Practical Classics article gave me the idea for the basis for this article. The “MOT” is a generally accepted abbreviation for the “MOT Test”, which is an annual test of vehicle safety, roadworthiness and emissions mandated by the Department for Transportation (formerly the Ministry of Transport). The test has become more rigorous over the years (since 1960) from the basic “brakes, lights, and steering” to a computerized test in a special equipment bay, including a “rolling road” dynamometer, with the computer generating the test criteria based on the VIN (vehicle identification number). Altogether probably more demanding than any State inspection in the U.S.A. although I believe that classic vehicles over a certain age are now exempt. The following uses the headers from the copiously illustrated article in Practical Classics, some of which may not have been my choice, with the text modified to apply to the MGA.
BASIC WEEKLY CHECKS
- Tire Vigilance – Check the tire pressures, including the spare. The factory spec. was 17 psi front and 20 psi rear for the original 5.60-15 tires. This size is equivalent to 155-R15 in today’s radial parlance, a size that is no longer readily obtainable. The closest available size is 165-R15, for which there does not appear to be a recommended pressure. I usually settle for 25 psi, which I think gives me a reasonable balance between driving comfort, road holding and gas mileage.
- Brake Fluid – Check the fluid level (Figure 1) – the level drops as brake shoes and pads wear, but a sudden drop indicates a possible leak. Replacement of the brake fluid every two years is suggested.
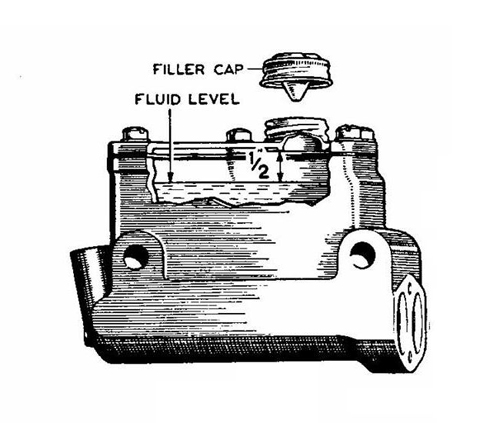
Figure 1 - Oil and Coolant – Check the engine oil level on the dipstick and radiator fluid level by removing the cap with the engine cold. Check transmission and rear end levels annually. Engine oil should be changed annually, or every 3,000 miles. Replacement of the coolant every two years is suggested.
- Headlights – Check that high and low beams function correctly, and the high beam indicator light in the speedometer. Check the aim on a garage wall or door as suggested in MGA! November/December 2014.
- Lights and Horn – Check that all parking lights, turn signal lights, brake lights and license plate light function correctly, as well as driving lights, if fitted. Check the turn indicator light on the dashboard. Check that both high and low note horns are working correctly, i.e., a good, clear sound.
- Seats and Belts – Check that the seats are securely anchored to the floor and that the adjusters provide a positive stop. If fitted (strongly recommended) check that seat belts are securely mounted, and that they latch securely and unlatch easily.
- Wipers and Washers (Figure 2) – Check that the windshield wipers operate, that the blades are in good condition, with no perished or split rubber, and that they clean the screen adequately. If fitted (again, strongly recommended) check the operation and aim of the windshield washer nozzles and check the fluid level in the reservoir.
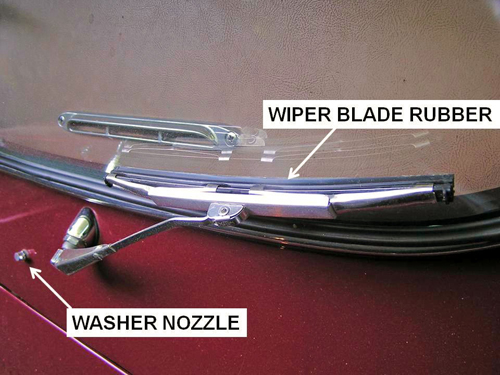
Figure 2 - Windshield – Check for chips and cracks. Small chips can be repaired to prevent further damage. A cracked windshield should be replaced.
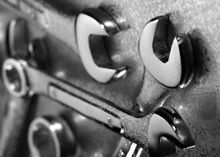
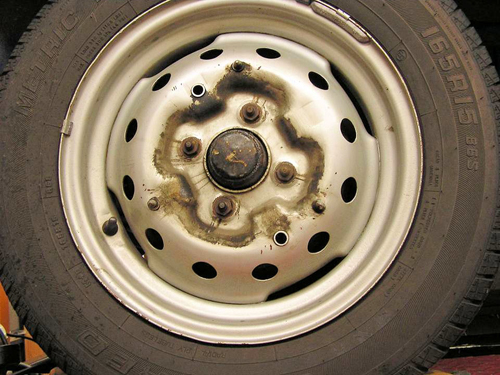
- Basic Visual Check – Look around the car for anything loose or unusually dirty or oily. Look on the rims for signs of leaking brake fluid and hub oil or grease. Figure 3 shows signs of slight grease leakage from a front hub, but not enough for concern. Check underneath for signs of coolant leaks, and for engine, transmission or rear axle leaks.
CHECKS WHILE YOU’RE DRIVING
- Steering – Check that the car will hold a straight line on a level road without pulling or wandering. Wandering would suggest incorrect toe-in or worn steering rack or joints. Pulling would suggest worn or damaged suspension.
- Footbrake – Check that the car will stop in a straight line when the brakes are applied, and that the brakes are effective. A pull on the steering wheel when the brakes are applied suggestsa front brake problem, drifting a rear brake problem.
- Feel the Hubs – After a few braking tests, get out and feel the hubs or drums (caution, they may be very hot). They should not be excessively hot, and all about the same. A hub or drum hotter than the others suggests a binding brake, one not even warm suggests no braking at all at that corner.
- Handbrake – Check the operation of the parking brake. The car should move to a push, or roll on an incline with the parking brake off, and be impossible to move with the parking applied two or three clicks.
- Knocks and Crashes – Knocks and clonks when traveling over a rough surface suggest worn or loose suspension parts, or possibly loose wire wheel spoke or hubs, particularly under braking or acceleration. Check the front inner rubber bushings or the outer pivot bushing and king pin swivel. Check the rear spring mounts and shackles, and the rear axle mount (MGA! September/October 2014).
- Squeaks and Squeals – Squeaks suggest worn suspension bushings, squeals suggest a slack fan belt, or debris stuck in a wheel.
- Judders and Vibrations – Wheel/tire imbalance will cause vibrations, and steering wheel shake at certain speeds. These vibrations can be made worse by worn shocks or suspension parts. Juddering when pulling away can indicate a clutch problem of worn or broken motor mounts. Juddering while braking can indicate warped brake drums or discs.
- Exhaust Note – A change in exhaust note may indicate a hole in the muffler or pipe, or a separated pipe. A “chuff-chuff” sound at idle may indicate a loose manifold or exhaust flange.
- Odd Smells – A gasoline smell could indicate leaky carburetors, fuel lines or gas tank, or maybe an open gas cap! Burning oil smell could indicate an engine or transmission oil leak. A sweetish smell could indicate a coolant leak.
BRAKE CHECKS ON YOUR DRIVEWAY
- Spin the Wheels – Jack up and spin each wheel. A small amount of drag on disc brakes is normal; there should be no drag on drum brakes. On discs, excessive drag suggests a stuck piston; on drums, a seized cylinder.
- Disc Brakes – Pads should have at least 1/16th inch material. Pry them back slightly from the disc and ensure that they, and the piston, are free to move. Step on the brake to check that they return.
- Inspect Calipers – Check their general condition, and ensure that the pad retaining pins are securely in place. Check for signs of leakage.
- Drum Brakes – Remove the drum and check the cylinder for signs of leakage. Have an assistant press the brake pedal by hand while you observe that the pistons move. Do not allow the piston to move more than an eighth to a quarter inch or it will pop out of the cylinder. On the front brakes, you may need to clamp a piston in place while you watch for the movement of the other. Figure 4 shows MGA 1500 front brakes and MGA 1500, 1600 and 1600 Mk II rear brakes. There is plenty of brake dust, but no signs of anything leaking.
- Brake Shoes – Check the braking surface is clean and dry (Figure 4), with no contamination from brake fluid, oil or grease. Check that there is at least a 1/16th inch of friction material at the thinnest point, and that it is securely bonded to the shoe.
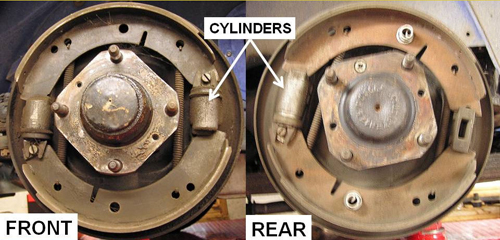
Figure 4 - Clean Brake Drums – Drum brakes are sensitive to a buildup of dirt or fluid. Clean the braking surface with brake fluid or solvent and allow to dry before re-installing.
- Hoses and Pipes – Check all metal piped for signs of corrosion or damage, and for fluid leakage at unions. Examine all (three) flexible hoses for cracking or other deterioration, and for signs of leakage. Figure 5 shows a front flexible hose that appears to be in good condition.
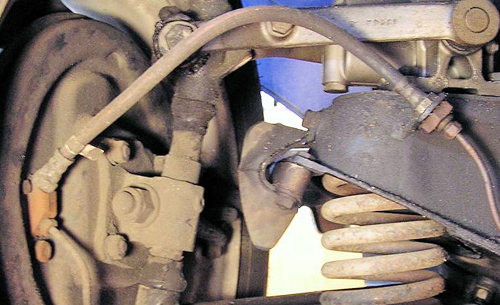
Figure 5 - Pressure Test – Hold the brake pedal down firmly for about 30 seconds. Softness suggests air in the system, or deteriorating hoses. Slow sinking suggests leaks in the system or the master cylinder. The need for pumping to get a firm pedal suggests the need for brake adjustment.
- Brake Servo – Not standard on an MGA.
The Practical Classics article had two more sections – “Steering and Suspension Static Checks” and “Other Regular Checks”. All of these checks identify potential problem areas, most of the remedies for which I have discussed in the past. Also, the astute observer will have seen that Figures 4 and 5 are actually pictures of my 1955 MG TF, which I have fitted with MGA brakes. I used the TF because it has been quite a while since I inspected these areas, and I thought it might provide examples of problem areas; it didn’t!
Comment by: Mike Ash
Thanks for the feedback, Ken. I think I have the shock absorber bounce covered in my next article. After that, I have one more part from the original PC article to cover. However, I would like to think that serious body corrosion would not be an issue with our cherished MGAs!
Comment by: Ken Clay
You are correct in stating that some Classics, pre 1960 are now exempt from the Annual MOT Test ..That’s not to say you can ride around in a poorly maintained Vehicle , the Vehicle should be in a road worthy condition and should be able to pass the appropriate test for the age of the car .
Another thing the MOT would look out for is Corrosion in the chassis or within the main monocot (sp) structure that would weaken the cars ability to survive a crash ..also they would be looking out for rust in the front of the bonnet-wings Etc that might cause injury to a pedestrian in the event of a accident .
Worth adding to you list is to bounce the car on each corner to check the shock absorbers /suspension.
Ken