
Recommended Safety & Mechanical Checks for Your MGA – Part 3

 In previous articles, I have described a series of tests and inspections I adapted from an article in Practical Classics that could be carried out before submitting an MGA for a state-mandated inspection.
In response to one of my articles, Ken Clay of London, England, responded on the NAMGAR site with: “You are correct in stating that some Classics, pre-1960 are now exempt from the Annual MOT Test. That’s not to say you can ride around in a poorly maintained vehicle, the vehicle should be in a road worthy condition and should be able to pass the appropriate test for the age of the car.”
This is also true here in Virginia where vehicles over 25 years old can be registered as an Antique Vehicle with similar requirements for roadworthiness as well as certain, not unreasonable, restrictions on use. So, even though formal state inspection may not be required for your car, it might be a good idea to run through these tests and inspections on a periodic or annual basis. I understand that in the U.K., some owners are electing to submit their classic cars for the annual MOT for their own peace of mind, even though it is not required. So, here is the next and final installment of “How to MOT your Classic Car Yourself,” as adapted by me for the MGA, and entitled:
OTHER REGULAR CHECKS
- Structure – Scrutinize the underside for rust, paying particular to attention to structural and load bearing areas. Ken Clay mentioned this as well in his feedback, but I do not believe it should apply to our MGAs unless you hauled a real rust bucket out of a junkyard and put it in the road without any attention! However, if you have never restored or refurbished your MGA and are unsure of its history, do examine the chassis frame closely, particularly in the area of spring hangers. Also, junkyard survivors can have significant holes in the chassis frame, maybe hidden behind the body doorsills or interior carpet, which could significantly weaken the frame.
- Suspension arms – Suspension and steering arms are not invulnerable to rust and damage. Wire brush loose rust and chip away at scabs. Check for bends and kinks that might upset wheel angles and affect handling particularly on the A-arms of the MGA. In extreme cases, as in a junkyard survivor, the A-arms and lower spring pan can rust out completely.
- Body – Bubbles, bulges, and recently appeared wrinkles signify rust coming through from the inside of a panel. Try to identify corrosion in its earliest stages and schedule repairs sooner rather than later. For the MGA, the body is not really structural; the structural strength being provided by the chassis frame. However, severe body rust could affect door closures and overall body integrity.
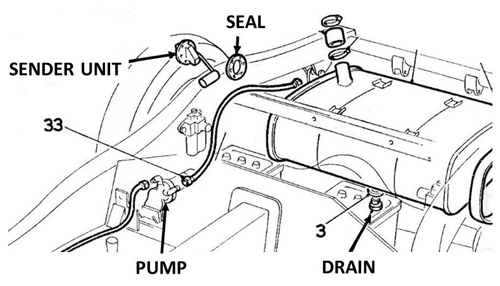
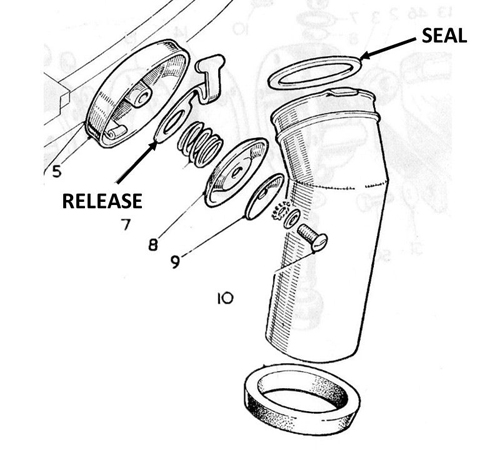
- Fuel system – Check the fuel tank for leaks, particularly around the gauge sender unit and the drain plug (Figure 1), and for damage or corrosion. Inspect fuel lines for deterioration, damage, chafing, and security. The fuel line runs along the frame rail, secured by clips. Check for leaks, particularly around the fuel pump, with the engine running. Ensure the cap closes securely, and is held closed by the release lever (Figure 2). Check that the sealing ring in the filler neck is in good condition.
- Exhaust – Check exhaust clamps and hangars for security. Inspect brackets, welded muffler joints, and crimped seams for stress fractures. With the engine running, look, listen, and feel for signs of leaking at joints.
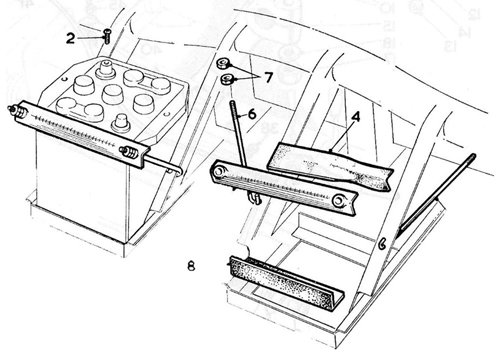
- Battery and Wiring – Make sure the battery is securely attached and its live terminal is well clear of the frame. The original battery tie-downs (Figure 3) work very well, but may need extending for a 12-volt battery. Look for deteriorated, chafed, or poorly routed wiring, particularly for the battery wire that runs the length of the frame and is secured by clips.
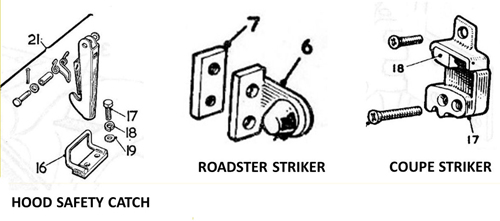
- Latches – Ensure that all door, hood, and trunk latches function properly. Check that the hood safety catch is correctly adjusted (Figure 4). Double-latching doors should close to second click without undue force. Both the roadster and the coupe have a safety position on the striker; make sure the doors close to the main latch position and that, by releasing them slightly, are caught by the safety position. They can be adjusted by moving the striker plate on the pillar.
- Driveshaft – Check the driveshaft sliding and universal joints for play or slackness. The rear joint in particular is prone to wear. A broken joint will allow the shaft to flail about dangerously.
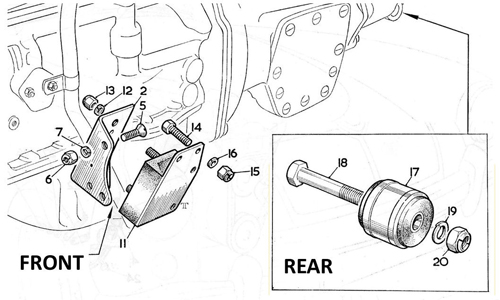
- Rubber Mounts – Check engine and transmission mounts (Figure 5) for deterioration, damage, sagging, and softness due to oil contamination. Make sure they are properly attached. On the front mounts, make sure the rubber block is bonded to the metal plate.