
MGA Top Header Rail – Getting It Right
July/Aug 2021 V46/N06
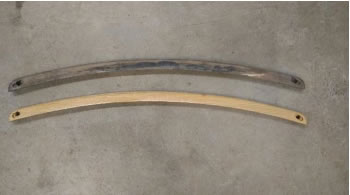 January, 2021, I began work on making a new wood top rail for my 57’ MGA Roadster. I had already made two early 1600 wood rails so felt confident and I still have the original to use as a pattern so it came out and fit very well. I also have my original early 1600 bow from my other car and sure enough they are the same except for the extended top surface for the center latch on the 1600. Now that I had made three, I decided to make patterns for all the bows because I’m sure I haven’t made my last.
I also have six original windshield frames (four are disassembled) so I started my measurements with the windshield frame top, because the frame top should be the basis for the wood rail curves (should be concentric arcs). I measured the length/cord (40”) and the height (2.875) for the inside curve = 71” arc. Adding 1” (windshield top frame front to back) = 72” radius for the outside curve. I verified this by drawing both arcs on paper (taped to the floor) then placing the windshield top frame on the arcs, they matched. So now it is simple addition and subtraction for the wood bows based on concentric arcs.
The outside curve of the wood bow, with ¼” overhang, (some measured 5/16”) has to be 72 ¼”. This is based on placing original wood rails on my cars and measuring the overhang. My 1500 & 1600 wood bow bottoms are all 1 ½” so the inside curve (where it fastens to the top frame) 70 ¾”. Again I confirmed this by drawing the arcs (full scale) and placing the wood rails on the drawing. Also confirmed from other owners of “known original” wood rails that 1 ½” is common to all of the rails with a sloped top.
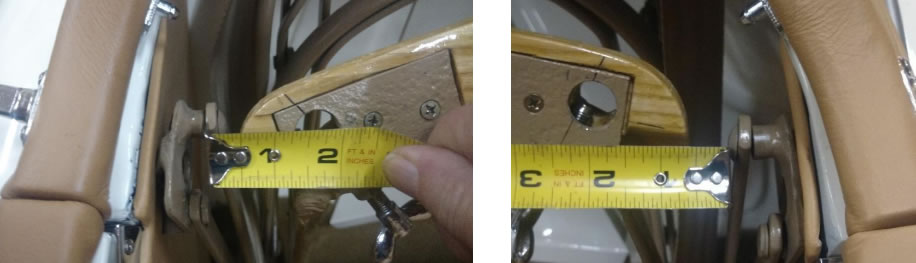
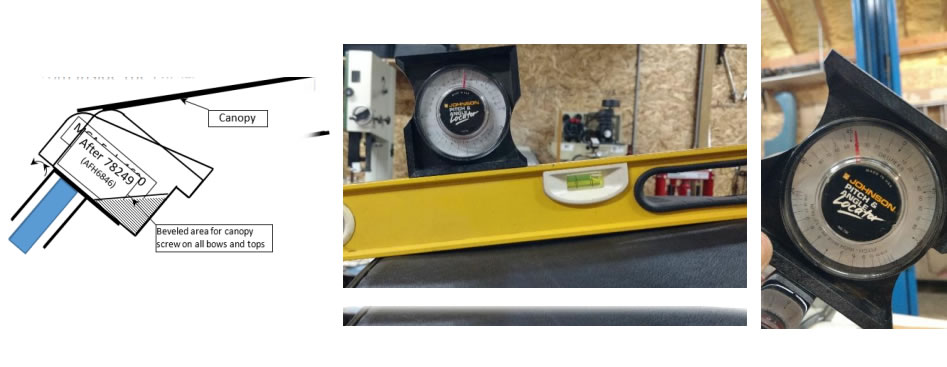
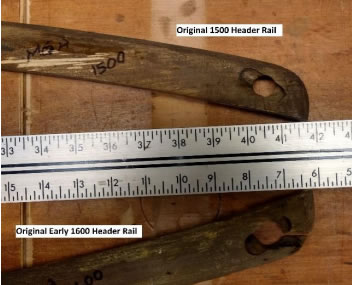 The length of all my original bows, is 41 ¾” so added that to the drawing. The distance of the two locking posts on the windshield is, 39 ¼” so the distance between hole centers on the wood rail, should also be 39 ¼”. Measuring from the frame mounting surface to center of the hole in the wood rail, is ¾”. I also measured the frame mounting plate to confirm both dimensions. The hole in the frame and wood bow are both 5/8”. The placement of the hole is most important to the assembly and fit, of the top, on the windshield frame (it must line up with the hole in the frame) and determines the overhang. When the top is mounted to the windshield, the locking screw first hits the lock post then draws the top rail assembly towards the rear, until the eyelet in the rail is tight to the locking post. Therefore, the distance between the forward edge of the hole and the front edge of the rail is the only dimension that determines the overhang. I measured the slope on the front of both bows to be 70 degrees from vertical so a 20 degree down slope to the front of the rail (20 degrees from level).
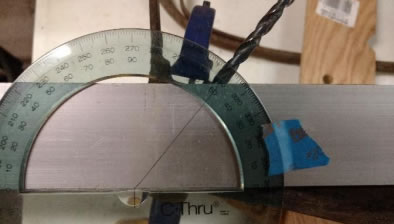 The mortise on the top, for the eyelet tabs on the 1600 wood bow, measured 30 deg from level (both inside corners against a straight edge) but the 1500 bow measured 38 deg . The slot for the locking screw should be 90 degrees to that. However, with the bow clamped in position on the frame and a drill slid into the locking screw hole, I measured 50 degrees (angle of drill to straight edge against rail ends).
While the frame was probably welded in a jig, it was also welded by hand so it is likely to have angular differences, frame to frame. The slot for the locking screw is short and twice as wide as the locking screw so the slot allows for angular error. The unforgiving piece of this puzzle is in the eyelet. If the mortise angle for the eyelet is off by too much, the lock screw won’t pass thru to the locking post. While a 30 degree mortise will work, 40 degree seems to be the best.
 The bevel on the end of the bow measured 45 degrees. This seemed odd because the rail, when mounted to the windshield frame, tilts to the rear at 40 degrees so a 40 degree bevel would be horizontal when mounted. I measured several times, in different ways and always it was 45 degrees. So maybe the steeper angle was meant to keep the rear edge and screw somewhat shielded from weather. Can’t ask the engineers so I don’t really know. I measured 45 degrees (many times over) so that is what is on the drawing.
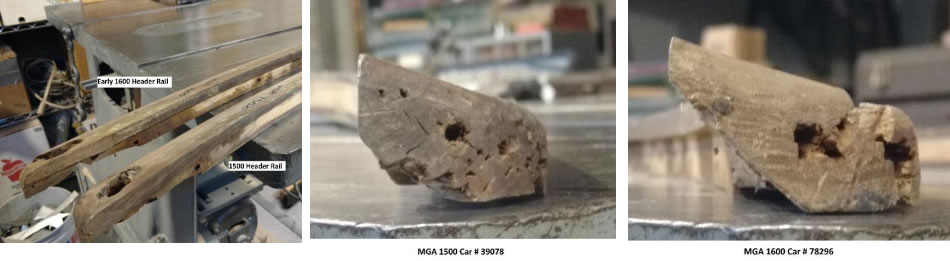
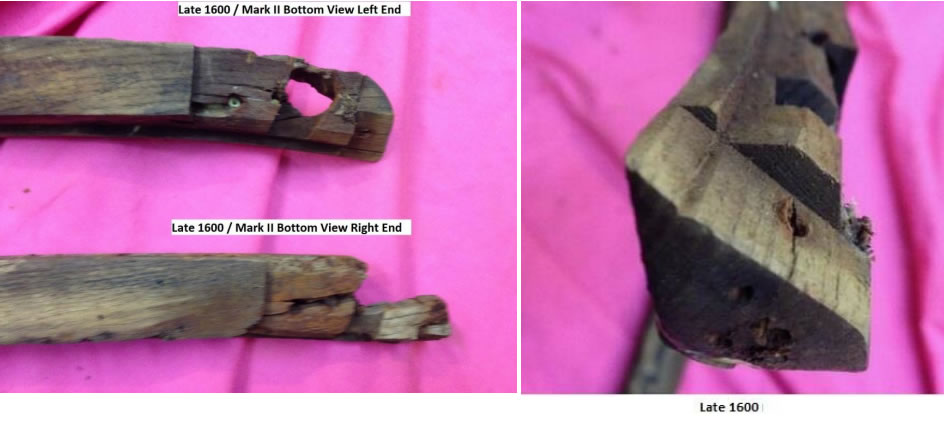
After completing the full scale drawings, I set out to find known original wood rails of all versions to confirm my drawing. After more than two months, I have been able to find several “known original” of three styles. Several that match my original 1500, several that match my 1600 and several of a third, that match each other (“known original”) but not 1500 or 1600. The third style, is also 41 ¾” long (same as 1500 and 1600) but has a different profile (1” thick, flat and 1 ¼” back to front) which also matches the profile of at least 3 suppliers, listed as AFH6846 Mark II. It is narrower back to front (little to no overhang of the windshield), no discernable slope back to front and a steeper back cut where the canopy screw goes. In my research, I found two articles and a few discussions that mentioned a wood rail that was too long and had to be shortened, TT-107A and TT-108 D. In both cases the wood rails were not original, both came from MOSS and both had incorrect cutouts for the eyelet tabs. I also found a few posts mentioning the same issue with aftermarket parts. So having found multiple “known original” wood rails, from “original owners” of late 1600 and Mark II cars, all measuring 41 ¾” tip to tip, all with the same profile and dimensions, no evidence of other part numbers, no evidence that the factory ever supplied anything different, also believing original owners, I feel the drawings are as near as I can get to original design of AFH6846 late 1600 and Mark II. Many thanks to Fred Horner and others who provided me with photos, measurements and checked my drawings against his original rails.
I found three, known factory original, styles and three part numbers (that I know of), makes sense to me that the part numbers are as follows;
AFH1746 – MGA 1500 Header Rail (vertical at the rear, 20 degree slope back to front and 1 ½” bottom back to front)
AFH6771 – MGA Early 1600 Header Rail (same as AFH1746 but extended top surface to allow center latch)
AFH6846 – MGA Late 1600 and Mark II (1” thick, flat on top and 1 ¼” bottom back to front)
So what about the longer header rail for wider top on late 1600 and Mark II? I never found one. The only evidence of longer header rails, were after market parts that had to be shortened to fit the canopy and had other issues as well. I also don’t see clearance for the longer bow to fold. Not to say the factory never made them but it seems very unlikely, given the “known factory” header rails I have found and the folding for storage issue ( ¾” longer on each end won’t fit past the mounting bracket and sissor arms).
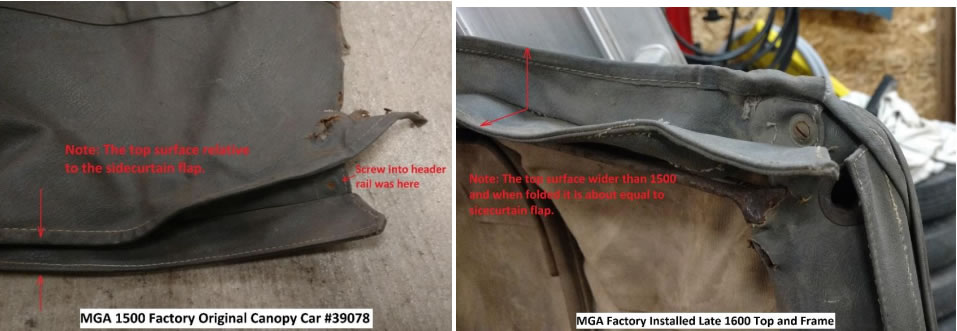
Also there is no need for wider frame or header rail. The wider top, fits just fine on the 41 ¾” header rails. The flap fits against the side of the frame which also supports the sidecurtian (which did not change position). The 1500 top, covers about half of the sidecutrain flap and the wider top (late 1600 / Mark II) covers about all of the flap without the sidecurtain. The sidecurtain will take up about ½” of the overhang. Also note that the screw in underside of the header rail end, was used on 1500 tops as well as the later 1600 and Mark II tops, didn’t change position and didn’t reqire a longer rail. It fits nicely just behind the windshield posts. The purpose of the screw, is to anchor the flap close to the windshild post so the wind doesn’t catch it.
Why does AFH6846 have a different profile? I can’t say with certainty, what the designer/engineer had in mind but being thick in the front, gives it more strength to resist lift, little to no overhang, also resists lift. The top surface being flat instead of sloped has no effect on looks or airflow because neither rail touches the top canopy. The header rail sets at 40 degrees down from level and the top canopy rises 10 degrees so the nose of the header rail, is all that affects looks and airflow. It does make it easier to see any staples placed on the top of the rail, from inside the car.
The four original tops I have dismantled, were all sparingly glued, to the header rail on the top surface.
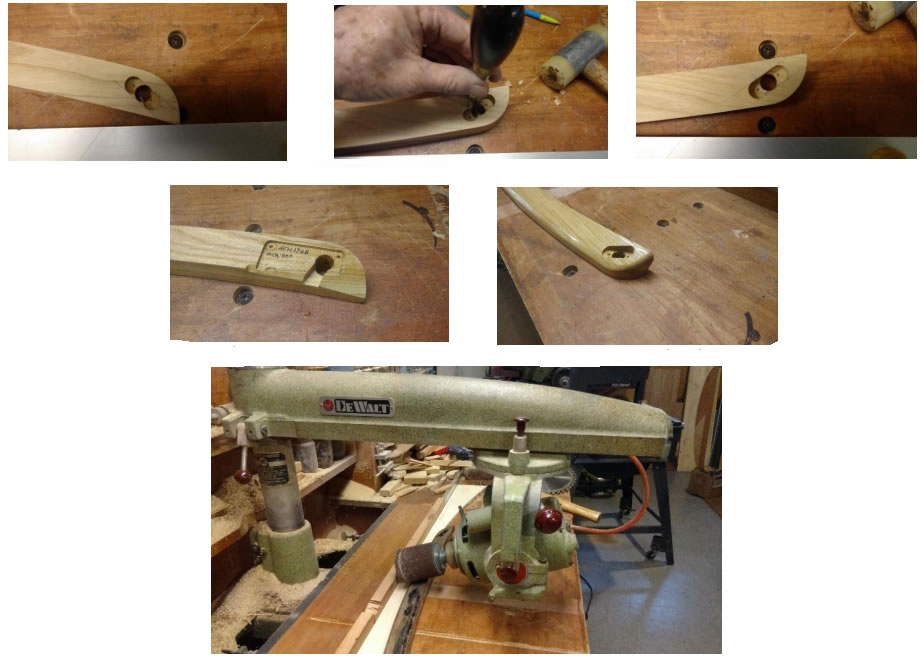
Note: If you are making your own, cut the top shape first (no slope or bevel), add the recess area in the rear if it’s not a 1500 rail and mount it to the frame with clamps and mark the lock post hole and plate. Then remove it and drill the lock pin holes, cut in the area for the lock plate, eyelet tabs, locking screw and the beveled ends.
Lastly, add the slope and round the top front edge. Not willing to buy a shaper bit, I used my radial arm saw with a drum sander for the slope. The ¼” plywood fastened against the saw fence, has the same arc as the outside radius of the top rail. This allows me to slide the rail under the drum sander while keeping proper alignment and distance.
A belt sander will work too but difficult to keep the angle and depth consistent across the length of the arc.
Otherwise, find a friend with woodworking tools or take it to a wood / millwork shop. I do have CAD drawings available
Written by Bob Shafto, March 11, 2021.