
MGA! Tech Talk – November/December 2016

Technically speaking, you might say Mike Ash and his predecessors have written about all there is to know about the MGA, Magnette, and variants of the MGA. After forty-plus years of technical articles, there’s just not a whole lot left to say about replacing or rebuilding a carburetor or repairing a steering rack….or is there?
I work on vintage cars for a living, and there’s hardly a day that passes in which I don’t discover something new. And I’m not alone. Glenn Lenhard, John Mangles, Tucker Madawick, John Twist, and many other shop owners in North America work hard each day to help make our cars safe and enjoyable. Many of these shops, parts suppliers, and manufacturers are members of the British Motor Trade Association. I am also a proud member, and enjoy sharing knowledge and learning from each of these craftsmen. As such, it is my goal to bring their talents, stories, and advice to NAMGAR so that we may learn a bit more about new technology and how it impacts or improves our MGs. Of course, any of your questions are welcome, as are your own tips. This forum will also discuss customization topics in addition to authenticity tips. Feedback is always appreciated. As former Editor Hal Roeth used to say, “A little controversy gets the membership involved!” So let’s start with something that came in my shop a few weeks ago.
Stiff Steering
A customer brought in a freshly restored MGA 1500 that he had just purchased. It truly was a well restored car….body off, powder coated frame, and everything apparently rebuilt or replaced. It could easily contend for a top award at any show. However, the customer complained of it having very stiff steering. And stiff it was! I could hardly guide the car into the shop!
Stiff steering can result from several different causes. The usual cause is simply lack of lubrication in the steering rack. But other things, such as tight or bent swivel pins, a bent steering rack, stiff u-joints on the steering column, or misalignment of the rack to the upper column can all contribute to a car that is hard to steer.
In this case, everything checked out okay…until we removed the lower pinion-bearing cap on the steering rack. No oil came out. Instead, we noticed about a quarter cup of another type of liquid that dripped out. It took a moment to realize the liquid was GASOLINE! Now, who would have lubricated the steering rack with gasoline? Then I got to think how I had smelled gas when we pulled the car into the shop. I traced that smell to a leaking rear carburetor. The banjo bolt, that holds the float chamber onto the main body of each carburetor has two rubber seals. The seals had deteriorated and gas was dripping (almost pouring) out around the seal of the back carburetor… and onto the steering column below…and running down the column to the steering rack…and past the felt seal in the upper pinion of the rack. Thus, the gas inside the steering rack!
Nothing was damaged internally, so a simple cleaning and refill with about six ounces of 80-90W gear oil, and one pump of grease to the upper Zerk fitting had the steering working nicely. Having made the steering smooth again was only half the repair. Preventing the gas leak from causing further havoc now had to be addressed.
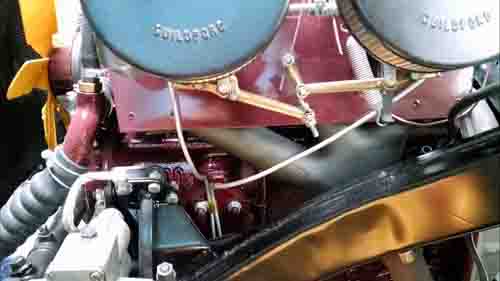
Carburetors – Banjo Style Bolt Setup
Pushrod MGAs were fitted with two styles of carburetors, pertaining to the float bowl attachment. The earlier 1500 style used studs and nuts, while the later style incorporated a banjo mounting bolt. Both used rubber washers, which acted as seals while allowing a bit of dampening from engine vibration.
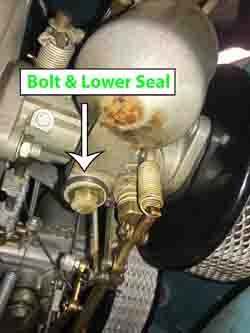 This car was fitted with the later banjo-style bolt set-up. Access to the float bowl bolts is the hardest part of the job. Plus, they will be a British Standard wrench size, in this case 5/16BS. Use caution, as any remaining gasoline in the float bowl will pour out! After removing the bolt, you can lower the bowl enough to swap out the old seals for new. When ordering replacement sealing washers, be sure they are of the Viton type, which will resist deterioration from modern gasoline. Also, be sure that the lower concave steel washers are in place so as not to overly compress the new rubber on reassembly. S.U. expert, Joe Curto, also warns that the retaining bolt can be over tightened, resulting in the bolt burrowing itself into the carburetor body. This results in the rubber seals being overly compressed upon tightening the bolt. He also recommends assembling the rubber seals dry (no sealer or lubricant).
While attending to the float bowls, it might be a good time examine the floats. If yours are of the original brass type, scrub them with a Scotch Brite pad to clean the surface. Carefully look for any stress cracks, usually running vertically above and below the solder line. If cracked, now is a good time to replace them with modern “unsinkable” nitrophyl floats. If nothing else, I suggest carrying a spare float as part of your regular travel kit. If a float should fail while on the road, it’s pretty hard to do much else than call it a day and order a new one!
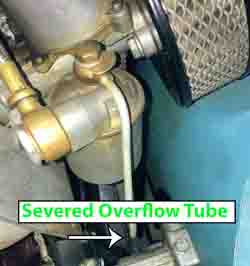 Lastly, the overflow tubes at the top of the float bowls are a very important part of safety, as well as proper functionality of the carburetors. Most cars have suffered from severed overflow tubes, resulting in any overflow potentially landing on the hot exhaust. Replacement tubes are available, and alternatively, you can repair your own rather simply.
Remove the overflow tube by loosening the top bolt on each carburetor float bowl. Again, this will be a British Standard wrench size, 5/16BS. Once the retaining bolt is off, be careful not to lose the two washers, one on each side of the overflow tube. Be sure the lower washer is of the fiber type, with three slots on the inner perimeter of the washer. This washer is very important to proper operation of the carburetors. The slots allow excess gasoline to be expelled around the retaining bolt, and into the overflow tubes. But maybe more important, it allows air to pass along the same path. Without this passage, trapped air would hinder the rise and fall of fuel in the float chamber, causing the engine to run poorly!
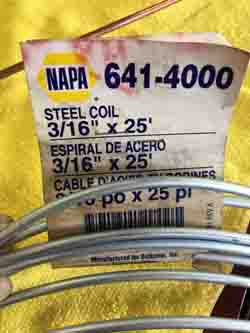 Replacement overflow tubes are readily available, but have a slightly different appearance, as some suppliers offer copper tubes as opposed to steel as original. It’s a fairly simple task to repair your existing overflow tubes. First, ensure all gas remnants are gone, and then cut or grind the old tube off flush at the banjo fitting. Next, drill the banjo, using the original hole as a guide. A 3/16” bit will be used. No need to drill all the way through. Leaving a slight shoulder works well. Next, insert a new 3/16” brake line, available from NAPA or other local parts stores. Solder the tubing in place. After allowing to cool, bend and cut the new tubes to fit your car. Most brake tubing can be bent without a tubing bender. But be careful when making a full 90-degree bend, as it may want to collapse.

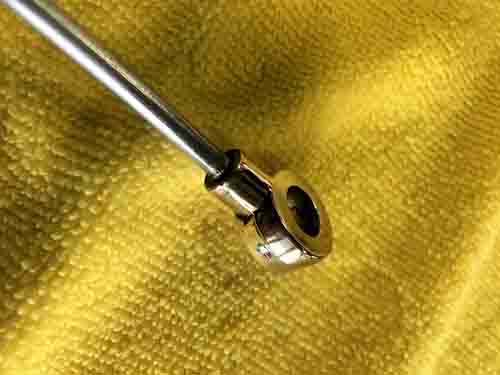
Be sure to check that the new overflow tubes are not blocked internally. The tubes should make their way down to the lower edge of the left side of the engine, secured by a brass P-clamp under a stud just to the rear of the engine displacement marking. The two overflow tubes should be cut just below where the oil pan meets the engine block. Once installed, you will have a very safe and proper overflow system in place!
I look forward to hearing your feedback, the direction you wish to go with future tech articles. Above all, be Safe…not Fast, when it comes to repairs!
Readers can reach Bruce Woodson by email.
Comment by: Andrew J. Wallach
When bending tubing without a bender, I insert a piece of wire almost the same diameter as the tube which I believe helps to keep the tube from collapsing.
Comment by: Michael B White
Great article very informative and easy to understand. Thanks
Comment by: Bruce Woodson
Thank you for the kind words, Martin. I look forward to sharing more unusual MG peculiarities in the future. I welcome input from your experiences as well. We’ve all faced some unusual technical challenges that are worth sharing!
Comment by: Martin Schlining
Interesting cause and corrective action for stiff steering. Nicely done.