
Another Review on the Installation of the MOSS Master Cylinder
I had the opportunity recently to evaluate one the new Moss Motors branded MGA 1600 master cylinders, specifically their part #180-751.
The vehicle that this M/C was going in is a 1962 MkII MGA. The existing M/C was starting to seep a bit on the brake side. Time for either a kit or a replacement unit. I chose to go replacement since the installed unit had been there a while. Honing and installing a kit can work sometimes, but this way, I would be sure.
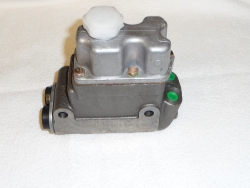
At first glance, the unit was identical to the OE one. Actually, some of the casting marks were a bit crisper on the new one. It would be nice is Moss would be able to reproduce the original style filler cap, rather than using the plastic one, but maybe that will happen someday.
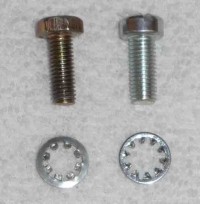
After the first brief inspection, I was actually a bit dismayed. Rather than using the correct fillister head screw to hold on the top and front covers, Moss chose to go with some metric hex head bolts. After a brief flurry of e-mails to Moss, I was very pleased to learn that the correct fillister head bolts, which Moss sells as #323-500, actually fit, and fit well, in the M/C. The supplied metrics internal tooth star washers are a bit tight, so I replaced them with similar ones, but that fit the 1/4-28 fillister head screws.
I am sure Moss feels they have a valid reason to go with the metrics, but it would be a whole lot easier if they either install them, included 7 in the box, or at least noted in the catalog and website that the customer might prefer the fillister head screws.
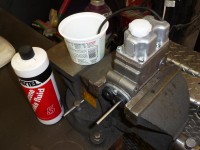
Prior to installing the new unit, I ‘bench bled’ it. This allows the installer to actually get hydraulic fluid, in this case silicone, into the bores of the M/C and prime them. Upon installation, this makes the bleeding process very straightforward.
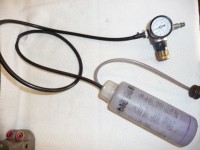
To make the system bleeding process a bit easier, I have modified an Eezibleed Kit that Moss sells. For me, it seems to work best at about 7 PSI of pressure. The kit is designed to hook up to a tire to provide the air pressure, so you need to drop the tire down to a lower pressure, and typically add a little air frequently. I cheated and add a mini regulator to the system. I can now attach the Eezibleed directly to an air hose from my compressor and take all of the time I need to bleed the system. Just a random thought here but if the Eezibleed folks can come up with a cap that fits the M/C, maybe they should provide new caps, with out the big hole, as an alternative to the current big, ugly, plastic cap.
Progress report. There were initially some issues with the pistons return correctly in the bores. I believe Moss has addressed that issue. This unit has functioned as designed for about 500 miles without any issues. Other than fillister head screws and the plastic filler cap, the Moss M/C seems to be a perfect replacement for the OE M/C.