
MGA Parking Brake
VOL 28/NUMBER 3
 MGA PARKING BRAKE (Part 1)
I adjusted the brakes on our MGA Coupe the other day and found that after adjustment, the movement in the parking brake lever from off to on had been reduced considerably, and that it was impossible to lock the parking brake in the on position. I had been experiencing the locking difficulty prior to adjusting the brakes, and I figured that probably there was some wear on the teeth at that location. Adjusting the brakes probably would bring the parking brake back into an operating range where it would hold.
As you all know, when adjusting the brakes, there should be no need for a separate adjustment of the parking brake, Over time, as the rear brake shoes wear, the free movement on the parking brake will increase. This free movement should not be adjusted out by the adjuster below the parking brake because the free movement will go away when the rear brakes are adjusted at the drum to take up the brake shoe wear.
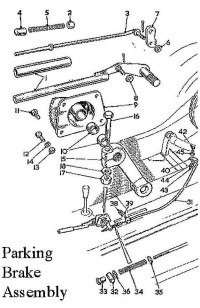
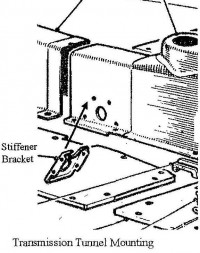
Removal of the parking brake assembly is not, however, a trivial exercise. It is held onto the side of the transmission tunnel by four bolts that pass through the tunnel, with nuts inside the tunnel. The bolts also pass through the two stiffener brackets inside tunnel. One is shown in the picture of the tunnel (Figure 2). The other is identical and attaches at the other pair of holes. These two stiffeners provide rigidity to the tunnel at the point where the stress of the parking brake is applied, as well as preventing the drive shaft from falling to the ground should one of the U-joints fail! Once the brake cable is disconnected from the bottom of the lever below the tunnel, the four bolts can be removed, and the lever pulled back to the inside of the car. I had hoped that with a bit of luck, that could be accomplished without removing the passenger seat and all the tunnel carpet and insulation. Further investigation, as can be seen from the drawing, revealed that to get access to the lower bolts, not only will the seat have to come out, but the floorboards will have to be removed as well. Another job for my non-existent spare time!
Some of you maybe wondering why I am so hung up on an operating parking brake, when you can leave the car in gear when it is parked. Well, since my formative years were spent in England, and I learned to drive there, it has never become my habit to use anything but the parking brake to prevent the car from moving when parked. In the absence of an effective parking brake on our MGA, I have been leaving it in gear, but I invariably forget to take it out of gear or put my foot on the clutch before trying to start the engine. Sometimes with potentially disastrous results if the engine fires!
So, as you can see, the handbrake was an integral part of the standard operating procedure for a car in Britain back when our MGAs were made, And, since you cannot teach an old dog new tricks, it is an integral part of my driving today. Because of the British driving technique of the day, our MGAs were never designed for the standard operating procedures here in the U.S, where it is much more common to sit at a stop light with one foot on the clutch and the other on the brake with the car still in gear, or leaving the car in gear while parked and starting the engine with one foot on the clutch and the other on the brake. Both actions can lead to premature failure of the MGA clutch, and the latter puts pressure on the crankshaft thrust bearings for which it was not designed.
Another thought on the function of the MGA hand brake is the design whereby the button is depressed to lock the brake on, rather than to release it. This was called a fly-off or quick release handbrake, and was fitted to all MG sports cars prior to the MGA, and probably some sedans. However, the Y-Type sedan, which was the contemporary of the TC and TD sports cars had a hand brake that was identical in appearance to that of the TD, but the mechanism was the more conventional press-to-release rather that the fly-off mechanism on the TD. The reason for the fly-off design was to support the cars sporting image as weekend, off-road, hill-climb competitor. A motor sport that was very popular in Britain in the 1930s and 40s, but started to decline in the 50s, In this role, the hand brake operation, without the need to depress the button, could be used for quick starts and to quickly lock the rear wheels into skid to aid rapid turns on dirt or gravel! However, the factory must have viewed the MGA as the last of the weekend competition cars because thefly-off hand brake was discontinued for the MGB. Also, because of the wider appeal of the MGA and MGB beyond that of the sporting driver, it may have been confusing to the majority of the owners.

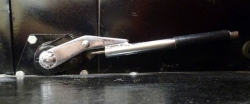
Since I wrote my last article, I managed to find the time to remove the passenger seat and floorboard from our MGA Coupe so that I could remove the hand brake assembly. (Figure 3) It turned out to be not too difficult because all but one of the floorboard screws came out with relative ease. However, as usual, there was one that refused to yield and had to be drilled out. But, one out of ten, or so, is not too bad after 20 years! Once the floorboard was removed, the handbrake assembly came out quite easily, but messily, due to the accumulated oil in the transmission tunnel. As I suspected, the lever was flopping about in the bushings, which contributed to making engagement of the ratchet a hit and miss affair. My spare hand brake assembly was in considerably better shape, except that lever was quite rusty due to its junkyard origins. So, I decided to use my original lever, with the remaining components from the spare. On disassembly of the original lever, I found that the rod between the button and the pawl was about a half-inch shorter than that of the replacement. My guess is that at some time it must have broken and someone threaded it down a bit. Also, the springs were different, but I did not have a third hand brake assembly to get a consensus on which was the correct spring. As you may recall from my last article, this entire exercise was prompted by the difficulty getting the handbrake to lock in the on position.
After my last article, John Hays sent me an e-mail to suggest I try backing off on the button to solve the problem, but he was too late. After examination of the components, I had come to the same conclusion: backing off a bit on the button might have compensated for the shortened rod and provided enough movement to allow the pawl to engage the ratchet. Also, because of the shortened rod, the spring might have been compressing fully, and preventing further movement of the rod, So, a combination of a loosened button and a shorter spring might have solved the entire problem without removing anything from the car. If I had received John’s e-mail earlier, I might have improved the engagement of the handbrake locking and have been able to put off doing the big job for a little longer; but now that it is done the improved operation of the hand brake has made it all worthwhile.
Comment by: Mike Ash
Russ: I did not take a brake lever apart to see exactly what is there, but the function is, as you say, to prevent the spring from passing the collar on the rod. I would suggest trying a washer with an inner diameter of the rod and an outer diameter of slightly larger than the outer diameter of the spring and slightly smaller than the inner diameter of the tube. Meanwhile, I will take a lever apart and see what the bush really looks like. I suspect it is a cup that fits over the end of the spring, and may help center the rod in the tube. I do not think a piece of fuel hose alone will solve the problem, but it might help with keeping the rod centered in conjunction with the washer suggested above.
Comment by: Russ Cape
I am curious about the bushing on the rod next to the spring. I don’t have one and it is unavailable from Moss. It seems to prevent the spring from jumping the collar on the rod. A piece of fuel pipe might work. Can anyone advise on dimensions?