Brakes Can Be a Drag. With the introduction of the MGA 1600, front disc brakes became standard equipment for the remainder of MGA production. This added an additional measure of confidence in the safety of the car.
Even by today’s standards, the braking power of the MGA 1600 & Mk II is excellent. The Lockheed calipers rarely give trouble. It’s not unusual for these calipers to go twenty years without a rebuild! While at some point, they will need attention.
In the case of the 1960 roadster that came into our shop recently, the brakes were said to drag. It was almost impossible to roll the car on a level surface. Even after sitting overnight, the car would not roll freely. When driving however, it stopped straight with no pull to the left or right, and the pedal felt normal. But the brakes just did not release cleanly.
To locate the cause, we raised all four wheels off the ground and spun each by hand. There was a very slight drag on the rear, which felt normal. However, the fronts were dragging excessively. Going around the car again, we rotated each wheel while a technician put moderate pressure on the brake pedal. The brakes responded equally on each. Upon release, the rear brakes unloaded, but the fronts remained almost locked. This indicated that the master cylinder and rear brakes were operating properly.
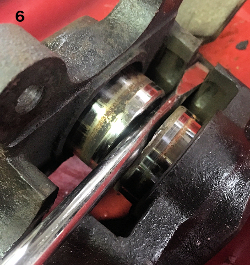
Indexing the WheelFocusing now on the front brakes, we removed the wheels. At our shop, we index the wheels (1) against the splines or lug studs on steel wheel cars to ensure we put the wheel back in the same position. It’s probably not necessary, but sometimes installing the wheel in a different orientation can cause a vibration that didn’t exist previously. With the calipers better exposed, our technician once again applied the brake from inside the car.
Opening the Bleeder ValveAs before, each front brake remained engaged when the pedal was released. But this time, working with one side at a time, we opened a bleeder valve on the caliper (2). If the brake had released, then we would have known the caliper was functioning properly, and there was a restriction in either the flexible hose or a steel line, which would prevent brake fluid from passing back to the master cylinder. But in our case, the front brakes remained tight even with the bleeder opened, and we knew the caliper pistons were binding.
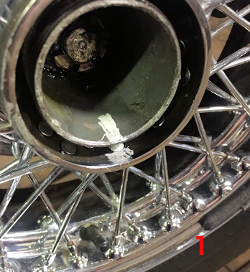
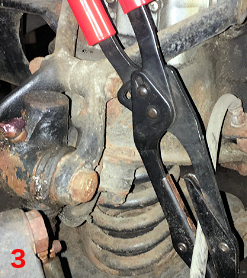
Crimping a Brake HoseFollowing procedures in the shop manual, we removed the brake pads and calipers from the car. Prior to removing the brake hose, we carefully (and lightly) pinched the rubber flexible hose to prevent the system from draining. (3) Please note, if you have stainless flex hoses, you should not compress this type of hose.
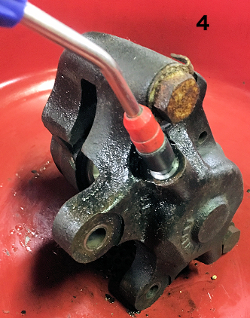
The next step was to remove the two caliper pistons. Since the pistons were sticking, we knew it was going to be a challenge to remove them from inside the caliper body. It is possible to use an air chuck with compressed air to blow the pistons out of the bore (4). But that procedure is not always reliable, and can be VERY messy when a piston does come out.
Using an Air Nozzle to Remove the Stuck PistonI prefer to use a regular grease gun with the tip unscrewed. Any type of grease that’s in the cartridge is fine. Carefully screw the tip into the open port on the caliper. The threads match well enough to accomplish the task at hand (5). Now simply pump grease into the caliper. The hydraulic pressure will remove even the most stubborn piston. But go slowly and watch the piston movement.
Pumping Grease into the CaliperInsert a large screwdriver across the gate of the caliper (6) and shim between that and whichever piston is moving at a faster rate. This will prevent that piston from being expelled before the slower moving piston is pushed out. (Once one piston is out, you will not be able to exert pressure on the other with the grease gun.)
Once you have pumped each piston to the point just before it falls out, remove your screwdriver and shim arrangement and pump the grease gun to expel the pistons. One or both pistons will now simply fall out with no big fanfare or mess in your shop! Of course, you will now have a lot of grease to remove from within the caliper body.
Retaining the PistonWhen the MGA was new, shop procedure recommended that the caliper halves not be disassembled. There was never any explanation, leaving most to speculate that a boost in the sale of new calipers was the reason. It has long been common practice by rebuilders to indeed split the caliper to perform a proper rebuild. Remove the three case bolts to separate the two body halves. Carefully remove the single fluid seal located in the mating surface of the outer body.
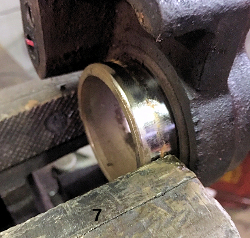
Using a Vise to Hold the Caliper BodyIf one of the caliper pistons did not come out completely in the earlier operation, you can now work the old piston out that last little bit by grabbing it in a vise (7) (but only if you will be replacing the piston). A slight twisting motion of the body of the caliper helps to work it out. We remove the bleeder valves and thoroughly clean the body halves, being sure to get all the grease out of the passageways!
The Lockheed caliper fitted to the MGA was one of the first to be incorporated on a production car, and the design was still evolving. As such, the MGA 1600 & Mk II caliper utilized a detent inside of each piston, which rode on a center pin in the bore of the caliper body. The intent was to allow the piston to move outward to engage the brake, and then spring back to give clearance for the brake pad. The detent would also hold the piston from vibrating back inside the bore while driving, thus preventing a low brake pedal. By the time the MGB was introduced, the detent was found to be superfluous. The main fluid seal itself accomplished the same task.
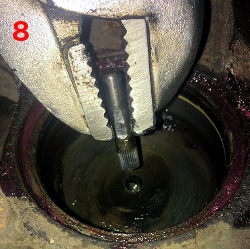
Removing the Friction PinWhen you rebuild the Lockheed MGA caliper, it is accept able to remove the pin and use the more readily available and cheaper MGB pistons. (I prefer the stainless MGB pistons.) To remove the pin, use vise grips (8) and gently rock the pin from side to side a few times. Then reposition the vise grips 180 degrees and wiggle again. The pin should now come out of the caliper body.
In the case of this car, I had already updated the calipers when I restored the car twenty-two years ago! The friction pins were removed and I had installed stainless MGB pistons. Upon inspection, the pistons still looked to be in relatively good condition. This perplexed me for a bit, as I wasn’t sure why the calipers were so tight. I removed the outer dust seal and metal retainer from the caliper bodies.
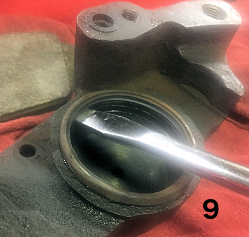
Removing the Dust-Seal RetainerCarefully remove the retainer by inserting a large flat blade screwdriver under the lip (9) and, gently pry upwards. Save these retainers if they are in good shape.
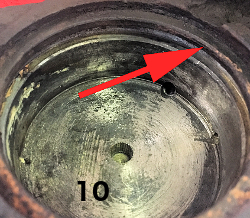
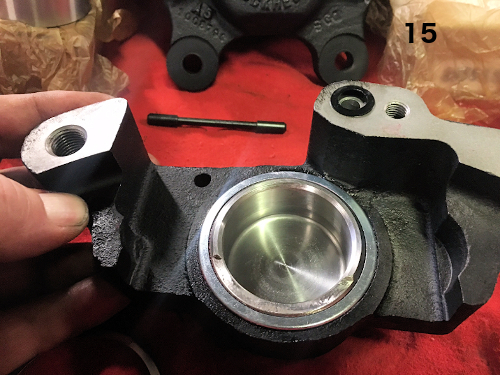
Next, I removed the main fluid seal, which appeared to be in good condition. I noted a small pocket of rust on the side of the bore, suggesting that water was in the system. This did not appear significant enough to cause the piston to stick. With the seals out, I inserted the pistons and found one to go in with ease. Yet, the other piston would not go in by hand. I substituted a new piston and it would not go in at all. Upon closer inspection, I found the caliper bore surface, between the outer dust seal and the main fluid seal, had rusted enough to impede piston travel! (10)
Discovering a Large Build Up of RustSince the critical fluid sealing area is between the main seal and the piston, there can be small imperfections in the caliper body, which will not affect performance. To date, I have not encountered a caliper that needed to be sleeved. It is permissible to wire brush or glass bead the caliper bodies and hardware to remove rust. (11)
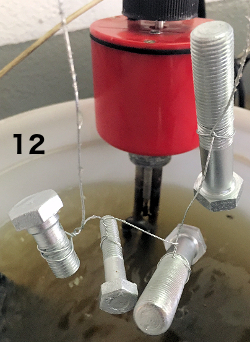
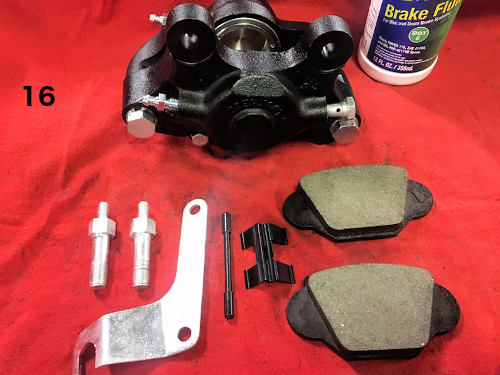
Glass Beaded BodiesOnce the oxidation was removed, the pistons slid in perfectly. This was confirmed by measuring the bores for an even amount of clearance. Next, we refinished the components by re-plating the hardware using techniques in our last tech talk. (12) The cast iron caliper bodies were most likely natural in finish when new. Cast iron engine paint works well, or in this case, the customer specified black.
Freshly Plated HardwareWith all the parts cleaned and painted, we were ready to begin the reassembly process. Working with one caliper body at a time, I lubricated the fluid seal with the same type of brake fluid I will be using and carefully place into the groove in the body. Next, apply a bit of red rubber grease to the bottom edge of the caliper piston and carefully insert the piston into the bore. Red rubber grease is an excellent product and will help prevent rust. But I prefer not to have the grease on the fluid side. While this grease will not contaminate the fluid, I prefer to lubricate the main seal with brake fluid.
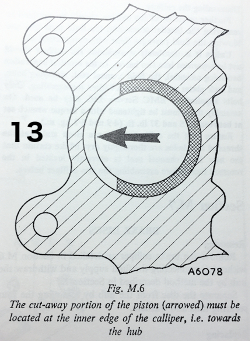
If you are using MGB pistons, you will note a portion of the top surface is recessed. This recessed portion should be indexed toward the inner edge of the caliper (pointing towards the hub when installed on the car) (13).
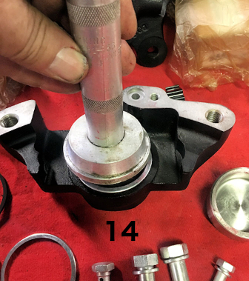
Indexing the MGB PistonGently push the piston in the bore about eighty percent of the way. Prepare the outer dust seal by lubricating the seal with red rubber grease and installing the metal retainer. The red rubber grease, which is compatible with all commercial brake fluids, will stay in the area between the outer seal and the main fluid seal thus protecting the caliper bore from rust. Carefully slide the seal and retainer over the piston. Once it is set level, you can use a seal or bearing driver (14) to press the outer retainer into place, or use some type of caliper piston tool. It is VERY easy to damage the retainer and they are nearly impossible to straighten. That’s why I suggest keeping your original in case you need it as a spare. My luck in getting these retainers on is about the same as getting an oil filter canister to seal every time after an oil change!
Using a Bering DriverWith the pistons and seals in place, you can now insert the fluid seal (15) on the mating surface and reassemble the two halves. Here, a touch of blue Loctite on the threads is recommended. Insert new bleeder valves as the originals can become pitted and hard to seal (16). Refit on the car, ensuring that you have the bleeder valves pointing upward. I have seen where the left and right calipers were swapped, resulting in the bleeders pointing downward…and the car had very spongy brakes!! Bleed the brakes, check for leaks, top up the master cylinder, and your MGA will no longer be a drag to drive!
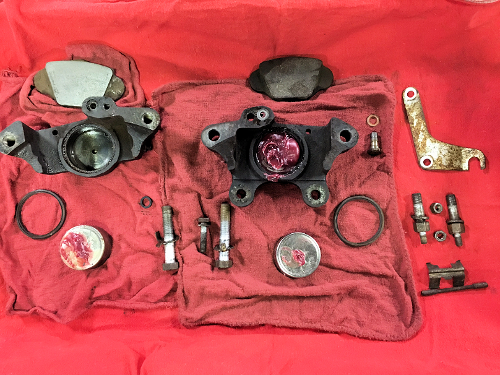
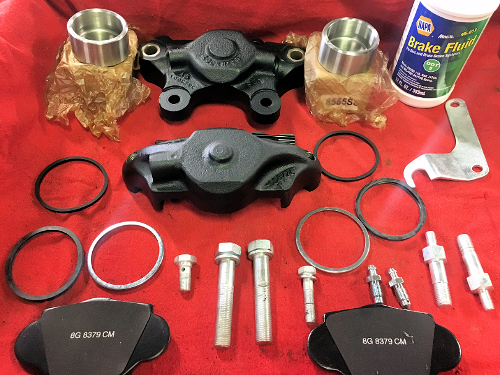
The caliper assembled half with fluid seal installedReassembled caliper ready to fit to carThe disassembled caliperThe refurbished parts ready for assembly


 Brakes Can Be a Drag. With the introduction of the MGA 1600, front disc brakes became standard equipment for the remainder of MGA production. This added an additional measure of confidence in the safety of the car.
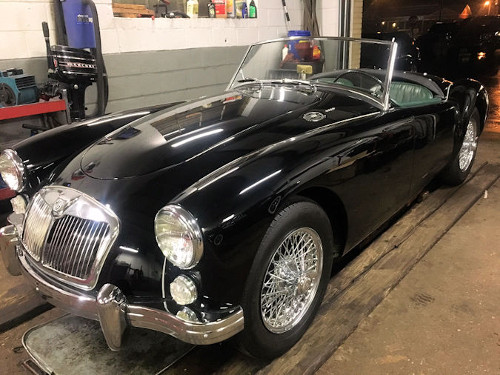

