
MGA! Tech Talk – January/February 2018

 Winter months in North America give MGA NAMGAR members the perfect and upgrades in preparation for the next driving season. While making a list of things to do, please consider checking your car for the following items that may not be installed correctly. Most are not critical safety items, but some may affect the performance of your car, while others are simply “conversation starters” at a car show.
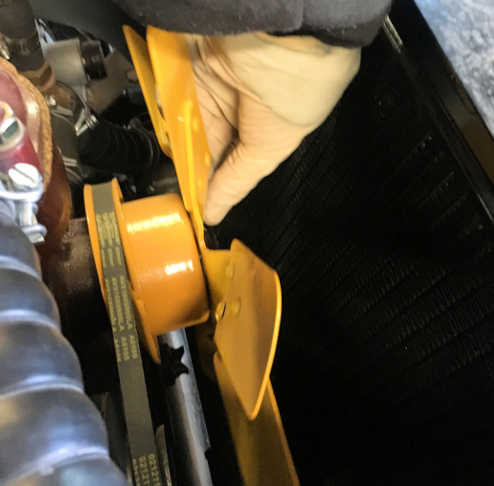
COOLING FAN
One of the most common mistakes I see is improper orientation of the engine cooling fan. The original metal fan can often be seen bolted on backwards. This sounds like it would result in the blades turning the wrong way, or pushing air forward instead of pulling it back through the radiator. But in reality, it is a subtle difference. The blades still work, but just not as efficiently due to the curvature of the individual blades. A simple look at your fan can determine if it is mounted correctly. The original metal fan is made up of a center hub and six blades. Each blade is riveted to a triangular shaped bracket on the hub. This triangular bracket should be on the front side of the fan blades when installed on the car. If this is not the case, then your fan is installed backwards and is not operating at maximum efficiency.
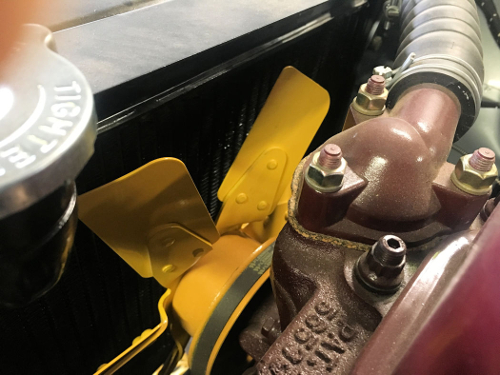
To correct the situation, you will need to drain off a little coolant (when the engine is cool), remove the upper radiator hose, remove the 5/16” bolts on each side of the radiator, and carefully pivot the radiator forward to gain access to the fan bolts. Remove the 5/16th bolts and remove the fan, leaving the pulley in place (no need to de-tension the fan belt). While the fan is off, take a moment to carefully inspect the blades for any sign of cracking, especially near the rivets. Reinstall the fan in the proper direction, followed by the radiator. Top up the coolant and check for leaks.
DEFROSTER FINISHERS>/h4>
The MGA defroster (demister) is certainly not the most efficient system when it comes to clearing a windscreen, but it does work better when the chrome finishers on the cowl are pointed in the right direction. It’s easy to install them so that the tapered edge is facing the occupants instead of the glass.
Reversal is simple in that you will just need to remove the two Phillips-head retaining screws and turn the vents around. However, the job is made more difficult because of the windshield glass. Use a very stubby screwdriver or angle screwdriver to carefully remove the defroster finisher screws. This is an opportune time to ensure the felt seals between the underside of the cowl and the defroster tubes below are in decent shape.

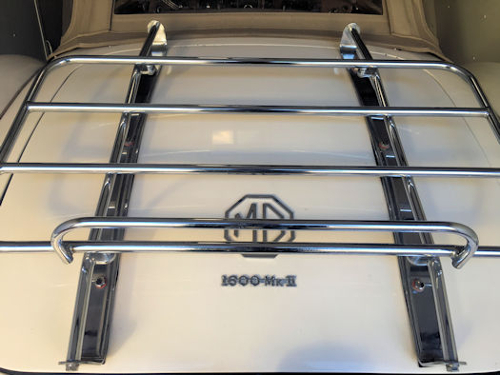
LUGGAGE CARRIER
There are many variations of the popular luggage carrier (luggage rack). The factory style is one of the more robust for carrying loads. However, it is easy to orient this style of rack improperly.
The difference is subtle, and I’ve even seen some instruction sheets illustrate it in the wrong configuration. If you have the factory style rack on your car, measure the distance from the rearmost point of the tubular support bracket to the nearest mounting point of that bracket to luggage carrier. Compare this distance to the same points on leading end. The rear measurement should be shorter than the front. The intent is that Carol’s luggage rests closer to the rear of the trunk (boot) lid when we travel, thus placing her 400 pairs of shoes lower on the car and reducing the amount of obstruction in the rearview mirror (but I digress).

If you determine your luggage carrier is mounted incorrectly, reversal is simple. Remove the four bolts that attach the two tubular carrier brackets to the lower brackets and carefully lift off with the luggage carrier still attached. (This is a great way to gain access to the deck lid for polishing or waxing the car.) Next, remove the two bolts that hold one tubular bracket to the carrier and rotate the bracket 180 degrees. Repeat on the other bracket. Reinstall the carrier assembly to the car.
REAR BUMPER BAR
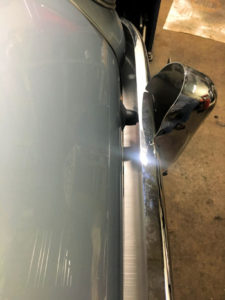
OVER-RIDERS
While on the subject of bumpers, it is possible to install the over-riders (bumper guards) upside-down. From an American perspective, the MG factory way does look upside down. On most American cars, the guards are traditionally thicker at the bottom, and thinner at the top. But on the MGA, the engineers wisely placed the wider area at the top to give more protection from those big American cars “over-riding” the MGA bumpers.
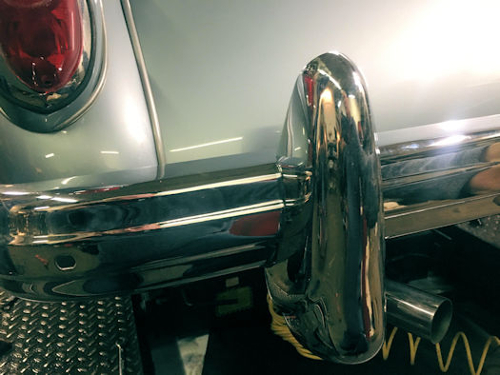
If you would like to reverse the orientation of your over-riders, carefully work a 9/16” wrench behind the bumper and unscrew the over-rider retaining bolts. This is also an opportune time to replace the packing material between the over-rider and the bumper face. From most suppliers, one packing piece will serve all four over riders. This also gives opportunity to de-rust and spray a little silver paint on the inside of your over-riders if needed.
TURN SIGNAL SWITCH
Recently I had the honor of driving the 100,000 MGA for maintenance purposes. Once back in the shop, our technicians tested the lights as part of the inspection procedure, and I was alarmed to discover that I had been signaling the wrong direction during my test drive! When I moved the lever to the left, I expected the left signal lights to blink. But instead, the right-side lights were blinking!
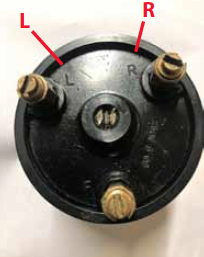 This topic goes back to many a discussion at GT parking lots late into the night. The argument for this improper way was always; “If you wire it the way the back side of the switch is marked (with L and R) on the terminals, then the right lights blink when you move the lever to the left.” Let’s be clear on this important safety device. The original Lucas flasher switch was a carry-over from other types of cars in which the operating lever stood up instead of hung down as in the MGA. By inverting the orientation of the lever, the effect of the switch is reversed. Thus, the terminal marking doesn’t apply to MGA wiring.
To conform your MGA to factory standards, the procedure is simple and can be done with the switch in place. Using a small flat-blade screw driver, loosen the retaining screw on the L terminal located on the rear of the switch and slide the wire out. Do the same for the R terminal and swap the two wires. That’s it! If you remain steadfast in your belief that you swing the turn signal arm in the same rotational manner as you are turning the steering wheel, at least put an L & R tab on your dash so that your mechanic isn’t run over while test driving your car!
AIR FILTERS
Every MGA and Magnette fitted with SU carburetors is dependent on a dedicated air vent to the upper piston chamber for proper operation. This vent allows the carburetor piston to rise and fall properly. If blocked, the piston will become sluggish and unresponsive, resulting in a poor running engine. The air vent originates at the air filter mounting face. Thus, two matching round ports are found on the air filter housings. It is possible to install the air filter bases and/or the mounting gaskets upside-down, which will block the vents. Removal of the air filter assemblies will be necessary to check for proper orientation, and correct if necessary.
DRIVESHAFT PHASING (PROPELLER SHAFT)
The driveshaft (excluding early MGA 1500s) incorporates a sliding forward yolk. This yolk must be indexed properly to be in phase, and in balance. The factory placed an arrow on both the leading edge of the shaft and the trailing edge of the front yolk assembly. To check factory phasing, position the car so that you can safely view the forward end of the driveshaft and rotate at least one rear wheel. You may need to remove rust or paint to see the arrows as they are not stamped very deep. If correct, the two arrows should be in alignment. If they are not, you will need to remove the driveshaft. Unscrew the knurled yolk retaining nut, slide the front yolk assembly off and reposition on the spines to align the arrows. This is a great time to check the universal joints for looseness or seizure. Grease u-joints if they have fittings, and reassemble.
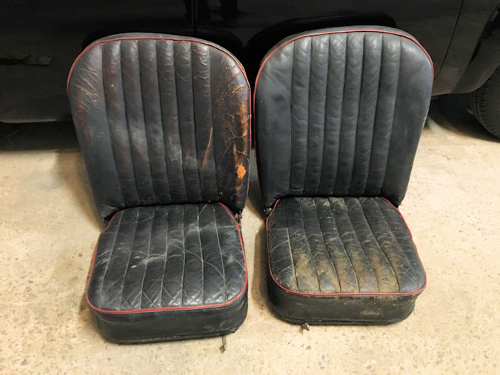
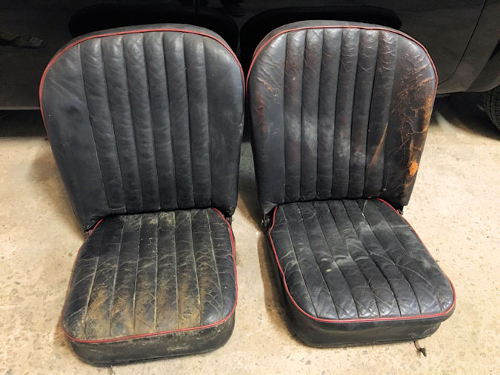
MGA ROADSTER SEATS (NOT COMPETITION DELUXE SEATS)
It’s easy to spot an MGA roadster in which the seat backs have been improperly installed. The uppermost perimeter of the standard roadster seat-back is radiused to match the shape of the cockpit. Thus, the seatback is taller towards the center of the car. If yours are in the wrong position, simply remove the bolts and swap the seat backs. I prefer that the nuts should be of a self-locking nature to draw tightly while allowing the seat-backs to swing forward for access to the curtain bag, top, and battery area.
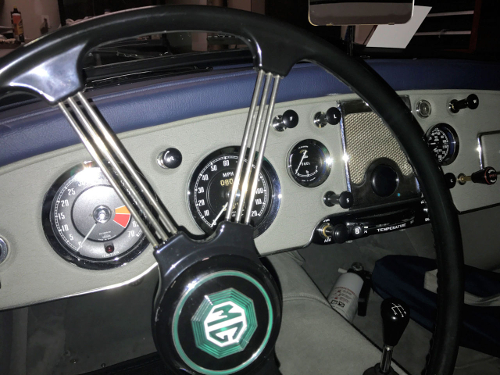
DASH COMPONENTS
The Dashboard (Facia Panel) can be assembled with several opportunities to reposition gauges and switches. Deviations from original locations have stemmed from personal preference to images on the Internet that are often incorrect. And the Factory Manual only shows how gauges are placed on a right-hand drive car.
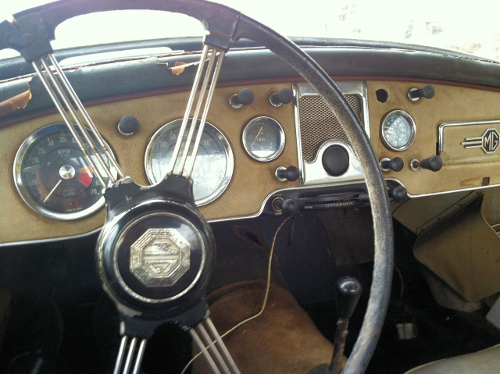
The correct order of instrument placement for a left-hand drive car is, from the left: Tachometer, Speedometer, Fuel Gauge, Temp/Oil Pressure Gauge. The switches should be, from left to right across the top, Direction, Panel Lamps, Fog Lamp, Parking/Headlamp, Ignition, and Wiper control. On the bottom from left to right would be the starter and choke controls, with an optional windscreen washer pump between the starter knob and the radio plate. On the far right is the map lamp and switch.
Now that you’ve got all these items tidied up on your car and you’re ready to show it off, I invite you and your family to come to Virginia for GT-43. If it’s your first opportunity to attend a National GT please let us show you why the NAMGAR family is so special.
Comment by: Wayne D Stambaugh
I agree with you John, especially if you have a key fob on you ign. key. The fob hangs down over the gauge below it. I’d rather miss the fact I was out of gas than I would miss being at low oil pressure or over heating. Even without a key fob it’s just more convenient to your eyes when the oil/water is next to the speedo. Glad my car isn’t a true show car.
Comment by: John Melton
It may be “wrong” but I still much prefer the oil pressure/temp. and fuel gauges reversed on a left hand car.